Announcement

Collapse
No announcement yet.

Building the Guppy Glider

Collapse

Zenm Tech Pte Ltd

Collapse

Visit Zenmtech at rc.zenmtech.com

X
 
  • Filter
  • Time
  • Show
Clear All
new posts

    #46
    Fuselage

    Lots of work to be done for the fuselage.
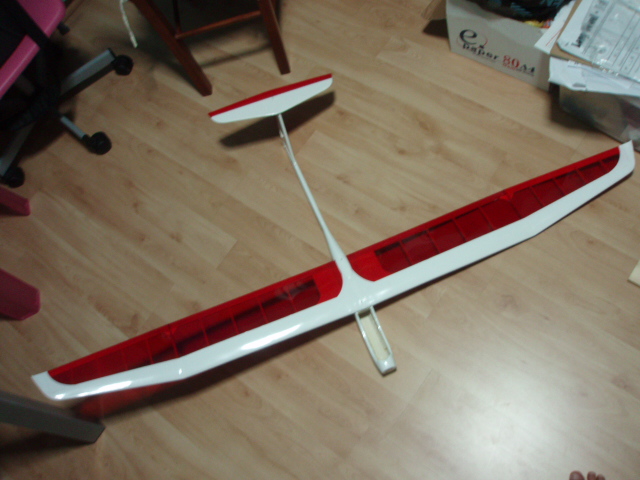
    There are 2 main sections - the Pod and the Boom. The Boom is from a 6mm CF tube, at the end of the CF tube is the vertical stabilizer. Holes were drilled for the push rod of the elevator and the rudder. Tape round the area to be drilled, this is to ensure the thin wall of the CF tube would not be damaged.
    The push rod tube+wire in the tube is secured inside the vertical stabilizer. After which, the top piece of 1/32 balsa sheet to complete the stabilizer.

    The Pod is then glued with the Boom. At this point, the horizontal alignment of the wing saddle and the horizontal line of the stabilizer is not 100% critical. Just make sure that the angle is zero to each other as possible.

    With the Pod and Boom assembled, next, I worked on the firewall. From the mistake I made with the first piece, I made the second one about 2mm bigger in diameter. As the motor is on the inside of the firewall, I need to make a recess for the 3 wires so that it would not be rubbing with the rotating part of the motor.
    The top piece of the front housing was stacked with a few pieces of balsa and then sanded to the shape of the firewall. The bottom 2 corners were filled with balsa fillet which extend all the way back to the wing TE former.

    The firewall was then dry-fitted and then glued in place.

    more work expected next......

    MS

    Comment


      #47
      Dry fitted the motor, firewall and the fuselage.

      Lots of shaving and sanding to be done, look at the balsa shavings here!

      Comment


        #48
        Shaving and sanding

        There has been lots of shaving and sanding. To me, watching the square block turn into a sexy curve is pure pleasure. As I did it very slowly, it took me more than 4 hours, with breaks to do other housework over the weekend to complete the sanding.
        The final fuselage is smooth and curvy. Even my daughter, Mae likes to touch the white and smooth surface!
        I breath in a lot of balsa dust in the process. The wing tip was sanded down with a curve upwards. I would think that the tips need to be glass or strengthen as it is a bit weak.

        MS

        Comment


          #49
          So near, and yet so far.....

          Well, I did mentioned that this is going to take me a long time to complete. Not that I wished to prolong this build, but I really need more time to build.
          To add to this long, long build, I will be on vacation with my family for the next 10 days......

          Over the last few days, I mean nights, I assembled the 4 wing panels together. The center section was reinforced with a layer of fiber glass+epoxy to beef up the joint. I prepared the joint and sandwich the fiber glass with a piece of plastic sheet and press the whole thing together with foam.
          When cured, just peel off the plastic sheet and you'll get a smooth finish. The amount of preparation work before the application of epoxy is equivalent to the type of results you'll get.

          The stabilizer was cut and I have decided not to cut holes in it, as I think it is light enough. The sacrifice of strength vs the gain in weight does not justify the purpose.
          The only modification to the control surface is the increase of the rudder area by increasing the width by about 10mm.

          Finally, I put together to see the almost complete Guppy glider!

          MS

          PS - I may not be posting this build for the next 10 days, as no work could be done when I am away!

          Comment


            #50
            Lookin' good!
            Man i love you people who can convert sheets of balsa into a beautiful plane

            Comment


              #51
              Thanks.
              I love to build planes from scratch, the feeling of completing a new plane all on your own effort is very rewarding. You just need to try it to experience the good feeling.

              MS

              Comment


                #52
                Cover-up job

                Back from my holidays aboard on Friday early morning. Had to catch-up on many things before I could do more on the glider.
                Check the mail box and recieved many letters from credit cards that I had never used, requesting for annual payments! Had to call them to cancel the card, but the usual stand from the customer service people is to continue with the card while they waived the charges.
                Unpack, store luaggges, read the past few days old newspapers, top-up fish tank water, vacuum the floor, more sleep, etc.
                Went back to the airport on Sat night to fetch my brother, coming back from Beijing, who picked up the Elf glider for me at 350RMB.

                Started work on the glider on Sat morning, starting with the easy part first, covering the wings. I chose a simple color scheme using the Red from Oracover-light and the white is Lightex.
                The covering of the wing is straight forward, only the concave part of the wing tips is a bit tricky. Ended up with some wrinkles.

                The fuselage was very challenging, due to the curvy bottom of the body. I had to pull and stretch and iron mm by mm. Fortunately, the 3 main seams were not very visible. Probably because it was white?
                There were some visible wrinkles below the wings saddle and near the nose of the fuselage.
                While holding the fuselage between my legs and ironing the cover, I burnt myself on the knee with the iron. See the picture of the mini iron that burnt me. Small price to pay, to see that the complete model is covered up. I am thinking of decorating it with the original Guppy Logo, or maybe some other variant of Guppy designs.

                I need to make the canopy. Need to see if I can find a suitable plastic bottle, or mold one out fresh.

                The glider is now 90% complete, with the installation of the servos, elevator and rudder horns, and mounting the motor. I am 101% happy, just by looking at the glider.

                MS

                Comment


                  #53
                  Good job! Looks great man!

                  Will you be attempting to pull a canopy out of pvc? or going to cut one out from softdrink pet bottle?

                  Comment


                    #54
                    Well, I recommend the h2o drink bottle and the 百华蛇草水 (snake flower water) bottle for those, they are 'seamless'.
                    "Always fly with a responsible attitude. You may think that flying low over other people’s heads is proof of your piloting skill; others know better. The real expert does not need to prove himself in such childish ways..." - the Multiplex Build Manual

                    Comment


                      #55
                      Thanks! I'll drop by NTUC and checkout the H20 and the Snake bottle for fit. If not, I'll curve one out of wood and mold with the PVC sheets. I had successfully molded one for my Formosa the last time, however, in the process, I failed on 5 attempts.

                      Comment


                        #56
                        Originally posted by msc View Post
                        Thanks! I'll drop by NTUC and checkout the H20 and the Snake bottle for fit. If not, I'll curve one out of wood and mold with the PVC sheets. I had successfully molded one for my Formosa the last time, however, in the process, I failed on 5 attempts.
                        Nice job , Kah Marn. You can carve the plug from balsa. Then, cut the ends away of the bottle, put the plug into it and pack some scrap balsa blocks under the plug until it is jammed tight within. Next, use a heat gun or hair dryer and shrink the plastic bottle until it confirms with the shape of the plug. One tip here, shrink the loose part under the plug first, before going to the upper portion where the canopy shape is going to formed.

                        Do it slowly and carefully or you'll have one week supply of H20 to finish up.

                        Comment


                          #57
                          Originally posted by msc View Post

                          Check the mail box and recieved many letters from credit cards that I had never used, requesting for annual payments! Had to call them to cancel the card, but the usual stand from the customer service people is to continue with the card while they waived the charges.


                          The fuselage was very challenging, due to the curvy bottom of the body. I had to pull and stretch and iron mm by mm. Fortunately, the 3 main seams were not very visible.

                          While holding the fuselage between my legs and ironing the cover, I burnt myself on the knee with the iron.

                          MS
                          The regulators should stop banks from behaving like Ah Long Sans . What they are doing is not much different really - just looks more respectable. Ah Long Sans with Gucci ties is what they are.

                          A suggestion for your next model is to use a few (boat shaped) segments rather than trying to cover a compound curve with a single sheet. Much easier to get a wrinkle free finish this way.

                          Thank goodnes it was only just your knee - could have been worse had it been a tad higher and considerably more painful .
                          To win........one must not lose.

                          Confucius

                          Comment


                            #58
                            Originally posted by Tony View Post
                            The regulators should stop banks from behaving like Ah Long Sans . What they are doing is not much different really - just looks more respectable. Ah Long Sans with Gucci ties is what they are.

                            A suggestion for your next model is to use a few (boat shaped) segments rather than trying to cover a compound curve with a single sheet. Much easier to get a wrinkle free finish this way.

                            Thank goodnes it was only just your knee - could have been worse had it been a tad higher and considerably more painful .


                            Don't tell anyone, I am actually the one who is ripping the banks off. I pay all my bills on time, I take the watches, trolley bags, laptop bags, BT headsets, etc.

                            BTW, the small burnt is not the first time. You should see the 4 stiches I got on my wrist from a propeller cut!

                            Comment


                              #59
                              Originally posted by msc View Post
                              I pay all my bills on time, I take the watches, trolley bags, laptop bags, BT headsets, etc.

                              BTW, the small burnt is not the first time. You should see the 4 stiches I got on my wrist from a propeller cut!
                              Ahhh....a man after my heart. Keep it up. Down with the Greed is Good credo

                              Worst I've seen - a guy who almost lost a couple of fingers and a minced wrist on the prop of a 50cc gas engine. Big engine and big prop doesn't mix well with small fragile fingers.
                              To win........one must not lose.

                              Confucius

                              Comment


                                #60
                                Canopy - Failure and Success!

                                Sometimes you think that you have almost complete your project and is about to pack up all the mess and minimize the constant nagging of keeping the floor clean, when you hit a road blocks.

                                The canopy was quite a bit of challenge. It took 2 separate trips to the supermarket and 3 different types of beverage to find the suitable bottle for the canopy. I tried the Snake water bottle, but it was too small. The 1.5L H2O drink was found to be the most suitable for my purpose.
                                It was also my first time trying the Apple flavoured isotonic drink, not too bad!

                                From the research, I chose to use the foam plug and 'let the pop bottle shrink' method. The main reasons are that foam is very easy to shape and there are abundant supply of pop bottles and varieties around.

                                The foam plug was shaped according to the estimated curvature of the canopy. Ensure that there are some excess height of the plug and to use a new blade to shave the foam. The final curvature was sanded smooth. Make sure not to leave any indentations on the plug as these will be translated to the finished canopy.
                                The smoother you finish off the plug, the better the final canopy would be.

                                The foam plug was then placed into the bottle with the bottom cut off. The whole bottle was then put into boiled water for a minute. Do not let the water continue boiling when you immerse the bottle into the water, just keep a very low fire to keep it hot would be sufficient.

                                The bottle will then shrink around the foam plug.....and you are supposed to get a nicely formed canopy!
                                Unfortunately, I failed in the first attempt. Just look at the results.

                                MS

                                Comment

                                Working...
                                X