Announcement

Collapse
No announcement yet.

DJ Aerotech Chrysalis 2ME Build

Collapse

Zenm Tech Pte Ltd

Collapse

Visit Zenmtech at rc.zenmtech.com

X
 
  • Filter
  • Time
  • Show
Clear All
new posts

    #61
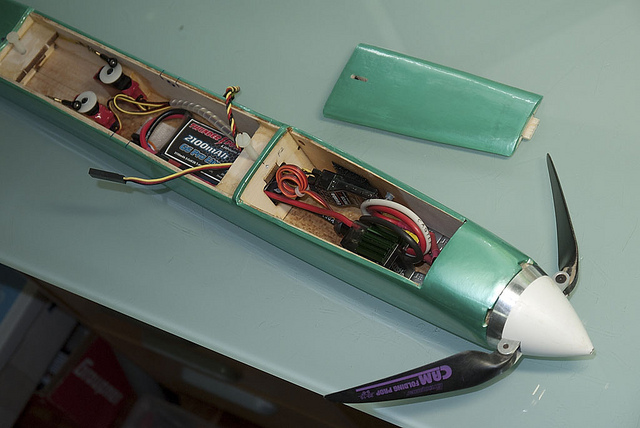
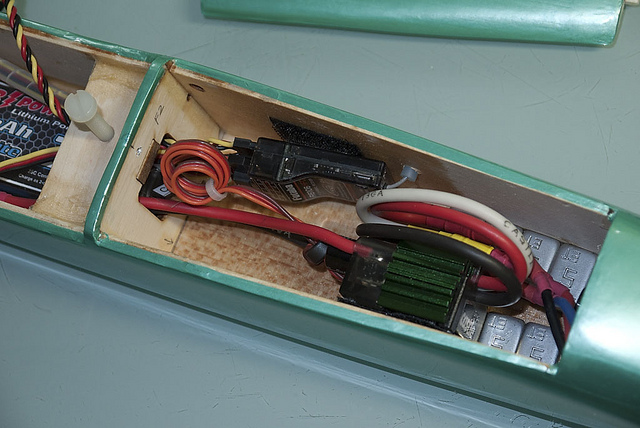
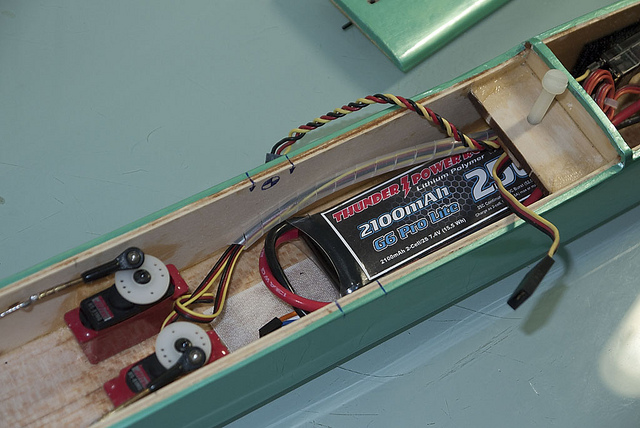
    I'm glad it turned out ok. When I first started with the initial panels, I had thought of swapping it for another colour because it looked too much like a great big green lantern. Still looks a bit like that to me now. I may add some cub yellow trim on the wing to break the monotony of the green.
    To win........one must not lose.

    Confucius

    Comment


      #62
      Did a little more work. Drilled and tapped the fuselage for the mounting bolts for the wing and glued the tail. Fixing the links for the air brakes took quite a bit of time to make the necessary adjustments to make sure that the servos were not stalling. If I were to build this plane again, I may consider not having air brakes. Almost complete now save for soldering the clevis links for the ruddervators. And then it'll be time to charge the batteries and go fly.

      To win........one must not lose.

      Confucius

      Comment


        #63
        This is a very nice looking glider. On the color scheme, my Passer-X has the same exact translucent green. When I fly it high and further away, I have problem with the top and bottom orientation of the glider, especially when I go into a turn.
        The green looks good on land, but due to the translucency, it appears as a dark shadow, both top and bottom. I almost got into trouble more than once. Luckily, it is still in one piece.
        Watch out when you fly the Chrysalis high.

        MS

        Comment


          #64
          I agree - green isn't a good colour as it does not stand out well against a blue sky. Adding some yellow trim may help - a bit.
          To win........one must not lose.

          Confucius

          Comment


            #65
            Hi Tony;

            very nice glider...
            "Always fly with a responsible attitude. You may think that flying low over other people’s heads is proof of your piloting skill; others know better. The real expert does not need to prove himself in such childish ways..." - the Multiplex Build Manual

            Comment


              #66
              She is finally completed and ready to fly. Final layout of RC gear, ESC and battery pack is shown below. Needed 40g of lead weight in the nose to get her CG within the range recommended by the manufacturers. The single coaxial antenna exists from the starboard fuselage side through a silicon lined exit. Something I shall be trying to do after the maiden flight is to swap the RX with the Lipo cell pack. By moving the Lipo pack forward, I should be able to remove most of the lead weights, saving myself some 20-30g in weight. The other advantage is that I won't have to remove the wing every time I need to replace the cell pack.


              I used a spare latch I had to hold the hatch down. I had originally wanted to use magnets but for the life of me, I can't find any in my parts bin. Strange.....because I thought I had a whole bunch of tiny Neodym magnets.


              The total All Up Weight (AUW) is 1064g or 37.53 oz - a decent weight and just 16 grams heavier then the manufacturers stock weight of 1048 grams. With a wing span of 2 metres and wing area of 723 sq. in., its wing loading works out at 7.4 oz psf.


              To lend an idea of the size of the plane, my two (over paid ) model launcher/retrievers are seen here holding the finished model and already contemplating the number of ice creams they are going to get for rendering their services during the maiden this weekend. I shall be adding some yellow trim later after the maiden. Right now I'm itching to get on with my next project.

              Last edited by Tony; 11-11-2011, 05:39 PM.
              To win........one must not lose.

              Confucius

              Comment


                #67
                Dang! Raining dog and cats all afternoon. No way no how for a maiden flight. Maybe tomorrow afternoon.
                To win........one must not lose.

                Confucius

                Comment


                  #68
                  The first attempt at a maiden flight nearly ended with an absolute disaster. The motor cut out within seconds of the launch but fortunately, I was able to land without incident. However, when my "model retriever" aka my son, was walking back with the plane, he reported that smoke was coming out of the plane. Caught it just in time or the whole model would have gone up in smoke. It appears that the ESC may have shorted out for some unknown reason. The setup was behaving rather strangely in the motor on earlier tests would stop abruptly and stutter and with the ESC emitting a loud screeching noise. However this would happen only intermittently and most times, the motor would run ok. I should have checked this out more thoroughly instead of ignoring it. End result is the loss of one lipo pack (it bloated), 1 burnt out motor and 1 burnt out ESC on the first test flight. The ESC got so hot that the solder joint of one of the leads to the motor melted right of causing the lead to fall out. That may have helped to save the plane.

                  Fortunately, I had bought 2 ESCs and had one left to replace the burnt out one but left me without a motor. Fortunately, this gave me the opportunity to try out a new motor. Due to time constraints, I had to have the motor asap or my maiden would have to be delayed for a few weeks. A call to Asia Pacific Hobbies had a nice chap by the name of Benny at my door step with the motor the next morning with the motor in hand.


                  I'm looking forward to checking out the motor today. So far, I've noticed a few things. The solidity and the matt camouflage green finish gives it a precision military like feel. The motor ran very quietly and smoothly - much quieter than my other motors. This looks like a product designed by a modeler who has applied a healthy dose of lateral thinking. Having an outrunner enclosed within a case and having the motor leads hardmounted to the rear of the motor case solves the eternal problem of keeping the pesky leads from coming into contact with the rotating motor case typical of outrunner type motors and makes connection to the ESC easier. This is usually quite a difficult task when trying to fit a regular outrunner within the tight fitting confines of a glider. With the MVVS, you just bolt the motor and connect the leads from the ESC without having to fiddle around with the placement of the motor leads at all. The motor has a fan built in and this should help with cooling, a regular problem within the cramped nose of a glider.
                  Last edited by Tony; 17-11-2011, 10:23 AM.
                  To win........one must not lose.

                  Confucius

                  Comment


                    #69
                    The motor was quickly bolted in and hooked up to the ESC and battery. A quick check with the techometer showed 9,120 rpm with a 2S 2,100 lip and Graupner Cam 10 x 6 folding prop. Won't know what the current draw is until I download the readings from the ESC later today. Probably in the mid 20, I guess. Battery got just warm after a 60 sec run at full throttle. And now, its time to head down to the field for proper maiden (hopefully - fingers crossed).
                    To win........one must not lose.

                    Confucius

                    Comment


                      #70
                      MVVS
                      most of my gliders are with thie motor

                      Tony, did you check the amp draw on your first setup?
                      maybe a amp overdraw and blew up the esc?

                      i always get the watt meter to check the amp draw for a new setup..
                      just to confirm that it is within the esc capacity :p

                      when going down again?

                      Comment


                        #71
                        I did not check because the motor and folding prop came with the Graupner Elektro Junior kit which I powered with s similar lipo pack. No issues then with this combination, so saw no need to check when I installed it on the Chrysalis with the Castle ESC.

                        I went back to the field with the MVVS bolted in and the maiden went without a hitch. The plane needed about 3 clicks of right trim and none on the elevator. With the CG set at the forward extreme of the recommended CG range, the plane flew a bit like a lead sled. After landing, I removed 4 lead weights (20g) from the nose and this transformed the plane altogether making it very responsive to inputs. The sink rate improved dramatically. I think she needs more down thrust on the motor and I may modify the nose a later time to incorporate a few more degrees of down thrust.

                        The MVVS 2.5 1480kv with the 9 x 6 Cam folding prop is a very suitable motor for this plane on a 2S lipo pack. The ESC's data logger recorded that the average current draw on full throttle was around 20 amps with the average peak rpm of about 8,100 rpm. Climb rate is very fast already and I don't see any need to try a 10 x 6 Cam folding prop that I had previously thought to be a possible future upgrade.

                        I have to increase the brake setting as the folding prop is still swinging in the air when the throttle is on idle.

                        The plane presented no vices. You have to be deliberate to try and get the Chrysalis to stall. Once the CG was set back, she was an absolute dawdle to fly. There was quite a bit of low level clouds during the flight and I'd lose sight of the plane every now and then. All I had to do was to let go of the sticks and wait for her to come out. Shows that she doesn't need constant stick input to keep flying.

                        Here is a very short clip of the maiden flight http://youtu.be/8vpcnNWQdsY

                        Overall, I have enjoyed building this kit. At the price the kit is sold for and the performance she packs, the Chrysalis 2 is real value for money. Wood quality is good as is the accuracy of the laser cutting. The kit comes with 2 very nicely drawn and reasonably accurate plans and fairly clear instructions.

                        The most frustrating negative I found with the kit is with the construction of the removable wing joints. The plans have some inaccuracies and if you were to follow the plans, as I did, you'd end up in trouble. This and several other faults in the kit have been highlighted on a number of forum postings. However, my discussion with one of the designers of the kit gave me the impression that they expect customers to plough through these hyper long forum discussions instead of publishing an errata sheet summarizing the mistakes and including it with the kit. I can just imagine the number of times customers must be repeating the same mistakes when it can be so easily avoided. Finally, you have to be quite patient with the company when placing your orders. DJ Aerotech's on line purchasing system will readily take your order but won't reply to acknowledge that your order had ben received and is being processed. If your emails to the company to follow up on your order continue to go unanswered - email Don Stackhouse - one of the designers. He was a great help to me. I eventually received the kits I ordered with his assistance.

                        The MVVS motor is a very nice motor and I think I shall be getting a few of the larger units for my aerobatic planes (conversion from i/c power). The design features of the MVVS motor makes it so much easier to mount the motor.

                        Other than the above issues, its been a very enjoyable build and I look forward to hopefully years of relaxed and fun flying my Chrysalis 2. Cheers.
                        Last edited by Tony; 17-11-2011, 07:14 PM.
                        To win........one must not lose.

                        Confucius

                        Comment


                          #72
                          Great! Glad to know that your 'Green Lantern' finally gets to fly.

                          Comment


                            #73
                            Now, if I can only find the ring that goes with the green lantern.............................
                            To win........one must not lose.

                            Confucius

                            Comment


                              #74
                              if you had that ring you'll be the one flying
                              "Always fly with a responsible attitude. You may think that flying low over other people’s heads is proof of your piloting skill; others know better. The real expert does not need to prove himself in such childish ways..." - the Multiplex Build Manual

                              Comment


                                #75
                                Originally posted by Sunstorm View Post
                                if you had that ring you'll be the one flying
                                ......now that would be nice. So, no green power of Will for me I guess.
                                To win........one must not lose.

                                Confucius

                                Comment

                                Working...
                                X