Announcement

Collapse
No announcement yet.

My CNC build

Collapse

Zenm Tech Pte Ltd

Collapse

Visit Zenmtech at rc.zenmtech.com

X
 
  • Filter
  • Time
  • Show
Clear All
new posts

    #46
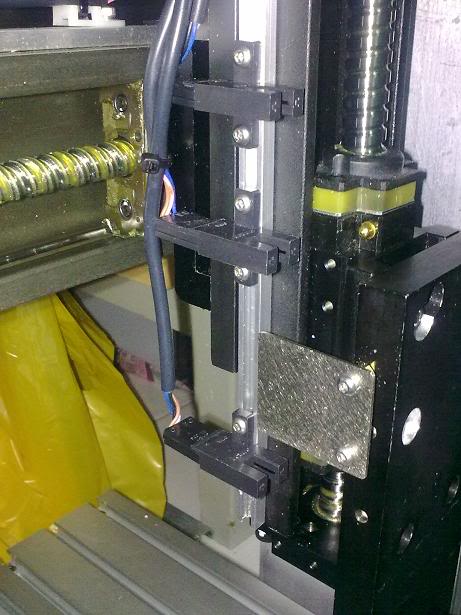
    Nope bro. They are from linearmotionbearings from Tian Jing China. They'll likely to make the z a little too "thick" for the size I'm building (from base plate of the z to the router). The rails you're using are of lower profile.

    I bought it as a package with x, y, couplers, supports, and ballscrews. About $800.

    Comment


      #47
      Oh my .... u guys making serious cnc router manz .... cool

      Nice nice

      Comment


        #48
        you bought it from ebay?

        $800 for a ballscrew XYZ axis is not a bad price at all.....

        What's your target material to cut?

        i have low profile slides, but it's kinda light duty.

        mounting a dremel is perfectly ok on it, but not to suitable for heavy loads.

        Comment


          #49
          Yes sir. The ebay ID is linearmotionbearings. the cuts made were not precise. All my 500mm round rails don't measure 500mm. Some longer and some shorter. They were not cut squarely too. Need some adjustments later when mounting.

          The price paid for the whole works was much cheaper than from US/UK and even Singapore. I was at the shop in SLT but couldn't fin matching rails. The place is too cramped up to do a thorough search.

          I've everything except the structure. Still no time to finishup my drawings to go buy the alu or profile.

          Comment


            #50
            Originally posted by Wongster View Post
            Yes sir. The ebay ID is linearmotionbearings. the cuts made were not precise. All my 500mm round rails don't measure 500mm. Some longer and some shorter. They were not cut squarely too. Need some adjustments later when mounting.

            The price paid for the whole works was much cheaper than from US/UK and even Singapore. I was at the shop in SLT but couldn't fin matching rails. The place is too cramped up to do a thorough search.

            I've everything except the structure. Still no time to finishup my drawings to go buy the alu or profile.
            oh that sucks, think you have to grind them to equal length then.

            take your time and think on how to design with minimum machining works.

            it's the most time/effort consuming factor.

            Comment


              #51
              Did my first test run today, spent the whole day fine tuning the motors.

              one thing i notice is my motor is very noisy at low speed but ok at high speed.

              it feels like there's a knocking effect on the motor shaft in low speed.

              I suspect is my driver, it lacks micro stepping. That's why it feels rough at low speed.

              i'll change to another driver with micro stepping later to test, very tired now

              Anybody knows why is it so?

              BTW here's some videos from the test run today.


              Comment


                #52
                Originally posted by flye View Post
                oh that sucks, think you have to grind them to equal length then.

                take your time and think on how to design with minimum machining works.

                it's the most time/effort consuming factor.
                Don't really need to grind as my my ballscrew assemblies (screw+the 2 supports) are longer than the rails. Just need to adjust a little in terms of mounting positions. That means my mountng holes will not be uniformed...

                Comment


                  #53
                  Been busy this week, however i managed to fix up the limit/ home sensors for all axis.


                  Also i got another driver and motor to enable microstepping, will wire it up and test it's performance next, but i need to make another motor mount as the mounting holes are different.


                  also did a connection box for all my sensors wires to terminate on the machine.

                  Comment


                    #54
                    What is this connection box and what do you mean by terminating all senor wires?

                    Btw, did you just join Rockcliffmachine's forum?

                    Comment


                      #55
                      Originally posted by Wongster View Post
                      What is this connection box and what do you mean by terminating all senor wires?

                      Btw, did you just join Rockcliffmachine's forum?
                      all my sensor wires will go into this box and soldered to the DIN connector.

                      then there will be a connector that will be connected to my breakout board in my motor driver box.

                      yeah i couldn't see your pictures posted earlier so i joined rockcliff to see it.

                      Comment


                        #56
                        Originally posted by flye View Post
                        all my sensor wires will go into this box and soldered to the DIN connector.

                        then there will be a connector that will be connected to my breakout board in my motor driver box.

                        yeah i couldn't see your pictures posted earlier so i joined rockcliff to see it.


                        did a little adapter for my motor shaft because the old shaft is 6mm while the new one is 1/4"

                        Comment


                          #57
                          What type of sensors are you referring to? Can show how to arrange and wired them?

                          Comment


                            #58


                            Just wired up today, the circuit works.

                            i'm using omron slot type optical sensor.


                            once the light beam is blocked, the signal line will give either a +ve or -ve voltage depending on your setting.


                            i try to explain, but i'm not good at it (i'm not electrical trained)

                            the red is 24V, black is 0V and the blue is the signal line.

                            if none of the sensors are blocked, the signal (blue) line will send a 0v to the next sensor and finally energize the relay coil.

                            if any one of the sensors are blocked, the 0v supply will be interrupted and the relay will close the contact between com and the input pin on the breakout board.

                            Comment


                              #59
                              Very pro!!!

                              Got chance to have a "factory tour"?

                              Comment


                                #60
                                Originally posted by Wongster View Post
                                Very pro!!!

                                Got chance to have a "factory tour"?
                                haha, my machine is in pieces now, still in the process of changing the motors + coupling.

                                i'll have to get a new box. now i really ran out of space for it

                                Comment

                                Working...
                                X