If this is your first visit, be sure to
check out the Rules and Help. You may have to register
before you can post: click the register link above to proceed. To start viewing messages,
select the forum that you want to visit from the selection below.
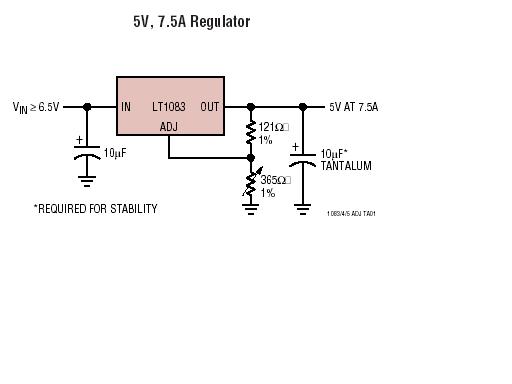
As you can see the Vin is 8V in order to have Vout = 5V, I think lower than 8V, the device is no longer working.
I tried to do this with LM317K or LM309K, I faced the same problem when my 2S Lipo dropped to 6~6.5 Volt. Some Elec guys told me normally the Vo-Vi must be around 2-3 Volts.
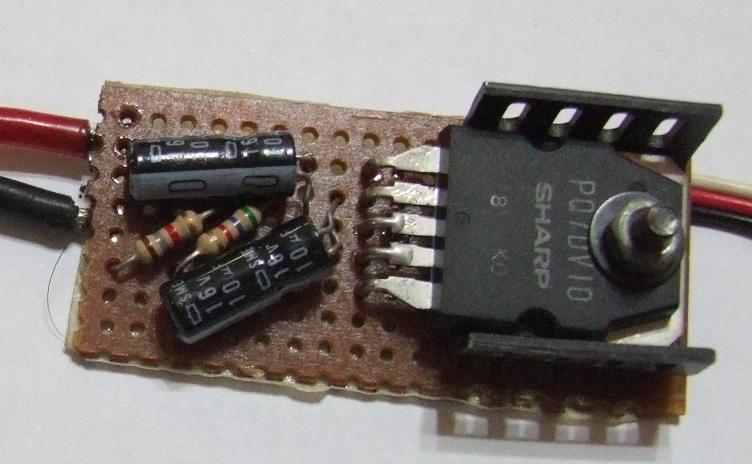
Cik Majid, I have tried the Sharp PQ7DV10 regulator.
Its perfect for our hobby use. In fact its the same exact regulator used in Fromeco's Relia-switch if not wrong.
Very easy to make and works on a wide range on input voltage.
It can handle 10Amps! Better or as good as off the shelve BEC/ regulators. Saved me $100+ on the Arizona regulator
And just like the Arizona regulator, if the switch fails, it will always fail on the "ON" position.
There's only one shop in Sim Lim Tower that carries the regulator. I cant remember the shop's name but its at the basement.
From the Jalan Besar main entrance, go down to the basement via the short staircase and immediately turn right and keep right all the way to the end, to the corner. The shop is the one in the corner.
Hope that helps
-Feda Dragonfly
-Hornet 2
-Pilot OK Turmeric
-Zoom Zoom 4D
-Sceadu EVO 50: OS50, Hatori521, Revmax,
-Hornet X3D
-Hornet X3D (yet to setup!)
-Formosa 1
-World Models Spot On 50
-HB King 2
-World Models Groovy 50 F3A
-RICCS F18 EDF
Thanks for sharing Fit. but a quick question, which circuitry should this PQ7DV10 use on ? the one inside the datasheet or an out right replacement on abdul's circuit ?
Cik Majid, I have tried the Sharp PQ7DV10 regulator.
Its perfect for our hobby use. In fact its the same exact regulator used in Fromeco's Relia-switch if not wrong.
Based on my calculation
To get 5V output
R1=2k
R2=6k
Thanks for sharing Fit. but a quick question, which circuitry should this PQ7DV10 use on ? the one inside the datasheet or an out right replacement on abdul's circuit ?
You are welcomed..
I just followed the "Typical Application" circuit diagram on the PDF file.
Based on my calculation
To get 5V output
R1=2k
R2=6k
Around there...got to experiment with different values to get the exact output voltage that you need. I ended up about 6.2K average for 5V and around 7.4K for 6V output.
-Feda Dragonfly
-Hornet 2
-Pilot OK Turmeric
-Zoom Zoom 4D
-Sceadu EVO 50: OS50, Hatori521, Revmax,
-Hornet X3D
-Hornet X3D (yet to setup!)
-Formosa 1
-World Models Spot On 50
-HB King 2
-World Models Groovy 50 F3A
-RICCS F18 EDF
You are welcomed..
I just followed the "Typical Application" circuit diagram on the PDF file.
Around there...got to experiment with different values to get the exact output voltage that you need. I ended up about 6.2K average for 5V and around 7.4K for 6V output.
Great info from Fit.
May I know,
1. How much is the IC (1-2 Pcs)?
2. What is the output current without Heat Sink? More than 3 Amp?
3. What is the minimum Volt from Lipo that the regulator still working correctly?
4. I need to add a swtich between Pin4 and Battery (-)/(+) for On/Off. correct?
2. What is the output current without Heat Sink? More than 3 Amp?
I have tried it with no air circulation but with heatsink at 8A for 20 mins with no problem. At 3A, lack of heatsink should not be a problem. But better to just add one. The heat dissipated will also depend on your output voltage. Higher output voltage, less heat build up.
Originally posted by Leo
3. What is the minimum Volt from Lipo that the regulator still working correctly?
The datasheet specs a min of 3V input. I have been running it with 2s Lipo with no problems.
Originally posted by Leo
4. I need to add a swtich between Pin4 and Battery (-)/(+) for On/Off. correct?
There's a number of way to incorporate an on/off swith. But to reap the benefit of the fail in the "ON" position and still use a regular on off switch provided with radios, I would solder a female servo extension between pin 4 and anyone of the -ve points. After which you can just connect a regular switch to turn it on and off.
Note: Even though the regulator is in the "OFF" position, a small amount of current still flows within the circuit. Always disconnect the battery from the regulator after a day's of flying. Otherwise your battery will be drawn dead flat over a few days.
-Feda Dragonfly
-Hornet 2
-Pilot OK Turmeric
-Zoom Zoom 4D
-Sceadu EVO 50: OS50, Hatori521, Revmax,
-Hornet X3D
-Hornet X3D (yet to setup!)
-Formosa 1
-World Models Spot On 50
-HB King 2
-World Models Groovy 50 F3A
-RICCS F18 EDF
As you can see the Vin is 8V in order to have Vout = 5V, I think lower than 8V, the device is no longer working.
I tried to do this with LM317K or LM309K, I faced the same problem when my 2S Lipo dropped to 6~6.5 Volt. Some Elec guys told me normally the Vo-Vi must be around 2-3 Volts.
Leo,
Vo-Vi need not be 2-3 volt ....this are normal voltage regulators like the LM317 series.
What you need is the LDO or low drop voltage regulators that Vo-Vi can go down as low as 0.3V. You can search the internet by keying "LDO Voltage regulator".
However ,these LDO voltage regulators are generally more costly since you need a regulator that can handle at least 1 Amp continous or more depending on the number of servos and the size of the plane you are flying.
A cheaper solution is to go for discrete Regulators. Such regulator can still operate as low as 5.7V and still capable of sustaining the voltage close to 5V when the battery drain down to 6V (2 cells Lipo).The Downside of discrete solution are they use slightly more parts .
Hi Abdul , I have tried a NEC 7805 5v regulator with specification of .
500 mA continous on 3 cells Lipo on 2 servo small plane up to 0.9M wing span . I use 2x 1n4002 in series to the Vin to drop the voltage and reduce heat dessipation to the regulator. I ran 24 hrs test on 500ma current with a Vin of 11V , no problem prior to installing on my 0.9mm Mugi plane so far .
I will go for discrete solution for higher current requirements for bigger plane and more servos using NPN transistor MJE3055 or equivalent.
My advise is to flood the entire discrete components with hot melt or resings (Epoxy) to prevent the components failure due to vibration and then run the test thorougly on the ground first....before installing on your aircraft
My advise is to flood the entire discrete components with hot melt or resings (Epoxy) to prevent the components failure due to vibration and then run the test thorougly on the ground first....before installing on your aircraft
See my completed DIY BEC and was tested good on my Nitro plane with 5x6.5kg servos.


Comment