Announcement

Collapse
No announcement yet.

Reichard Modelsport Siruis

Collapse

Zenm Tech Pte Ltd

Collapse

Visit Zenmtech at rc.zenmtech.com

X
 
  • Filter
  • Time
  • Show
Clear All
new posts

    Reichard Modelsport Siruis

    First of all, I need to thank Pang from Soaring Composites for importing this gorgeous sailplane from Czech Republic.

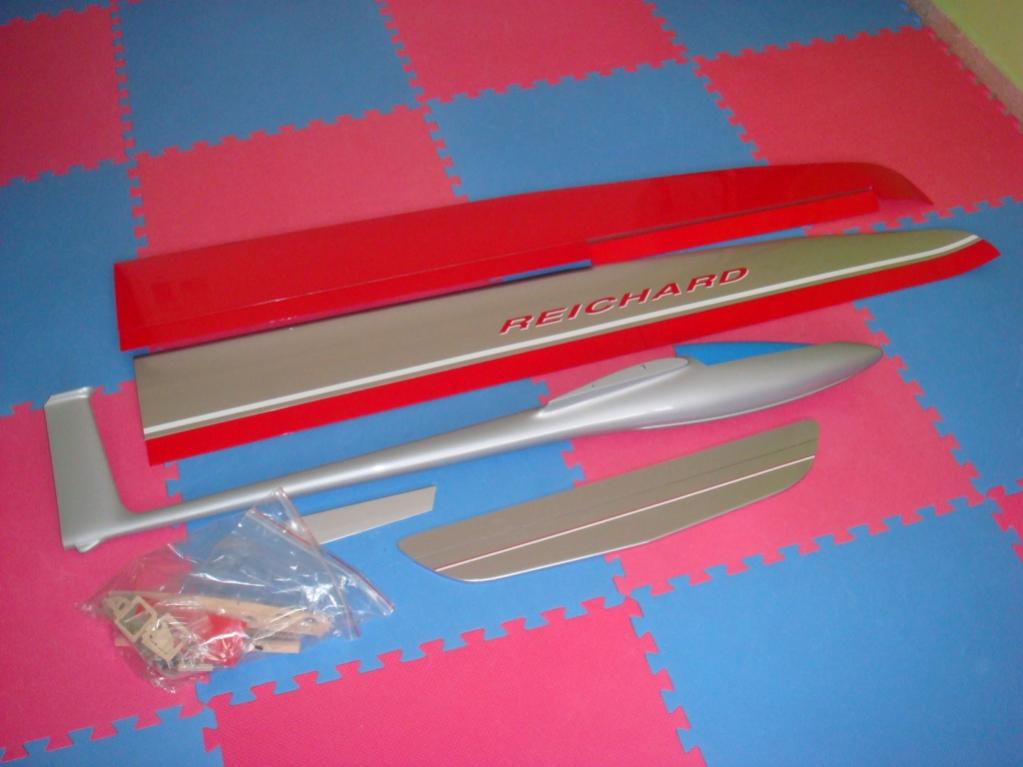
    I have came to know this model a few years ago and have been eyeing to get one myself one day. This 3 metre span sailplane comes with a fully moulded fibreglass fuselage with a complete nose, carbon reinforced sheeted foam wings and built-up tail. Although marketed under electric glider, the full nose fuselage suggested that this model can be built as a slope glider as well, as per the Reichard Modelsport website's suggestion.

    I was previously thinking of using it for electric power, but had since lost interest with electric gliders, for purer thermal ships. Since I came to know that some folks are keen to see it fly from slope in this season, I thought that this could be a good opportunity to build one for slope and aerotow during off-seasons. The volumnous nose should provide plenty of space for many options to come.

    These are the vital specs of this beautiful model;

    Span : 3.05m
    AUW : ~2.2kg ( electric)
    Airfoil : Selig 3021
    Fuselage : Fibreglass
    Wings: CF reinforced sheeted foam core
    Controls : Aileron,flaps, elevator,rudder,motor


    #2
    Upon receiving the package, I was amazed by the quality of the model. The fuselage is very well moulded with very shiny finishing, and yet does not have the cheap look of overdosed gel-coat. It is surprising light at 340 grammes with a canopy in place.

    The wings are beautifully covered with Oracover and the worksmanship is difficult to fault. The most impressive part is the parabolic wingtips, which are flawlessly covered as well.

    The kit comes with complete hardware, including a 8mm and a 3mm hardened steel joiners. It even incude CNC cut servo mounts and plywood fuselage crutch for the electric outfit and servos. The wing is designed to be kept in place by rubber banding the 2 wing roots, and a rubber band 'fishing hook' tool is also included in the kit.

    Comment


      #3
      Hey Joe, with all your newly bought new toys and the ones which you are scratch building will there be any space in your house to store all of these? Let me know if you're clearing out some of your old toys...I think I can find space for them at my place

      Comment


        #4
        For my previous composite gliders builds, I tend to start off by installing the flight controls and thier servos in the fuselage, but any drilling and grinding on the fuselage done later always create a big mess in the fuselage cavities.

        For my Sirius, I chosed to do all the dirty jobs first and clean it up before going any further.

        First thing I did is the canopy retention system. A small hole is drilled on the front of the canopy base and followed by a wood screw being installed halfway down. A slot is made on the front of the canopy cutout on the fuselage moulding to receive the canopy rentention screw. The aft edge of the canopy cutout is trimmed for the canopy latch. A small slot is made on the fuselage top of the canopy latch handle.

        Comment


          #5
          Originally posted by Curare View Post
          Hey Joe, with all your newly bought new toys and the ones which you are scratch building will there be any space in your house to store all of these? Let me know if you're clearing out some of your old toys...I think I can find space for them at my place
          Hee, no thanks. My Mother-in-law gave me her storeroom space for my fleet expansion.

          Comment


            #6
            The 8mm steel wing joiner is supposed to rest on the wing root fairing, and I do not actually like the idea. All my composite gliders have a metal tube epoxied across the wing roots and I do not want to omit it for 2 good reasons. The tube will act like a guide that allows easy inserting of the wing joiner, and can stiffen up the wing joint and fuselage moulding considerably.

            I happened to find a suitabel brass tube that fits snugly over the steel joiner. I have to enlarge the pre-drill holes on the wing root fairings to accept the brass tube. For now, I have not epoxy it permanently until the wing alignments are being checked.

            Comment


              #7
              The holes drilled on the wing root fairings for the 3mm steel wing joiner needed a little filings to get the alignment right. Once done, the wings can be fitted to te fuselage without too much effort.

              With the wings installed, it starts to look even more impressive!

              Comment


                #8
                The 2 mounting holes on the fin, for the horizontal stabilizer already have factory fitted metal inserts, but the excess resins in the threads need to be cleaned with a 3mm tap.

                Use your finger or pen to feel for the 2 predrilled holes, hidden under the covering film, on the horizontal stabilizer. Open them up and push the 2 nylon mounting screws through, along with the metal cup washers, and fastened them down over the vertical fin.

                Comment


                  #9
                  Very nice Joe. Looking good so far.

                  Comment


                    #10
                    I was quite worried about the visibility in air when I saw the colour scheme from the pictures. Luckily, the bottom of the wings and stabilizer are covered in red.

                    Comment


                      #11
                      Beauty!

                      -David-

                      Comment


                        #12
                        Subscripted !


                        ...here's hoping mine won't turn into another NIB (No Intentions to Build !)
                        Seriously running out of ...Storage space !

                        Comment


                          #13
                          You better start now, before the winds die down.

                          Comment


                            #14
                            Originally posted by Ghostfit View Post
                            Subscripted !


                            ...here's hoping mine won't turn into another NIB (No Intentions to Build !)
                            how many have you got?
                            "Always fly with a responsible attitude. You may think that flying low over other people’s heads is proof of your piloting skill; others know better. The real expert does not need to prove himself in such childish ways..." - the Multiplex Build Manual

                            Comment


                              #15
                              The servo wells on the wings are located and the covering film around them are removed witha sharp penknife. The edges are trimmed a little to accept the plywood servo cover frame. I haven't glue them down yet, just dry fitted only.

                              Comment

                              Working...
                              X