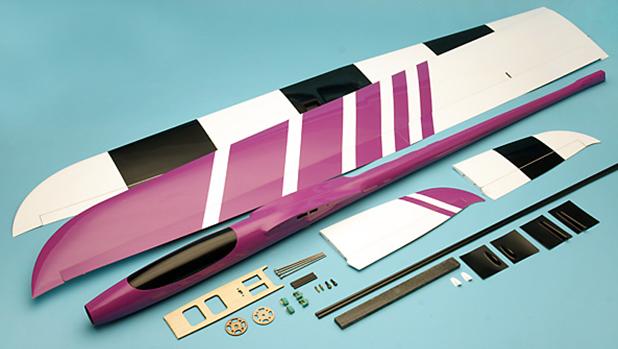
There's a new V-pro/Pilot/OK composite 3.18m on the block. It's called, rather uninspiringly, the Fennel. I've been working it over the last few weeks, and I've just came back from an interesting maiden at Old Holland Road, assisted by Sunstorm & Steve. More on the flight a little later on the thread, but in posts below, I'll be leaving a few important tips for those who are considering this very pretty bird.
Announcement
Collapse
No announcement yet.
Fennel Composite Sailplane
Collapse
X
-
What's in the box
It came taped in bubble wrap without a box, essentials only. This is likely the first production batch, and not everything shown came with my kit so this kit requires a little fabrication.
Motor mounts, connectors, servo tray rods and and clevises were not included, and I rolled my own from supplies.
Here's the link to OK model's Fennel site in Japan:
sigpic
... Why does everything I think I need always come with batteries?
John Mayer
-
Thanks Joe! Now you know why I dropped off the planet for a while.
Back to the kit:
Length 1442mm
Wingspan 3180mm
60.83dm2 wing area
Weight 2615g (electrical specifications.)
43g/dm2 wing loading
Modified RG15 airfoil
Overall, the build quality of the kit is decent. Fit's adequate, everything's symmetrical. Moulds are decent - all angles seem true. Skins are thin as you'd expect, meaning that you'd still handle with care. The finish isn't perfect - you can feel and see a little wavyness in the relections on the wing.
Looking into the servo bays, there's braided carbon reinforcement running the length of the central wing spars, otherwise it's standard fiberglass from what I can tell.
It features a solid, straight rectangular carbon spar. The holes in the wing needed a little sanding to get the spar to fit. Shining a light into the spar socket, epoxy coverage wasn't that great meaning a looser fit that desired. But it looked adequately strong. Once fitted, there's still a very small dihedral.
The ailerons needed a little sanding to get them clear of the flaps at full deflection. Otherwise the wing is built up nicely.
sigpic
... Why does everything I think I need always come with batteries?
John Mayer
Comment
-
V-tail
This models V's are fully removable.
Two pairs of 3mm steel pins go into the base of each V tail and cross in the fuse.
Fit of these pins into the tails was impossible. I had to drill out the holes in the base of the fin and polish all 4 rods before they'd go in about an inch and jam. (Gosh that was fun). Countless trial fits later, a dremel was taken to the pins and they were finished off on a bench grinder.
Check the inside of the fuse for adequate reinforcement around the pin holes. The assembler forgot to reinforce the entry and exit holes for left fin with (white) expoxy.This had to be fixed.
Once done, the tail feathers are qute snug although I'd still tape them in flight.
sigpic
... Why does everything I think I need always come with batteries?
John Mayer
Comment
-
Motor mount & nose reinforcement
The kit came without a motor mount, so one was made with 4 sheets of 1mm ply, cross grained and interleaved with fiberglass. I could've used carbon sheet, but I reckon fiberglass ply was more similar in modulus. Flexible, yet bulletproof.
I took a leaf from Dennis' mount technique from his eGinger build thread. A large 12mm hole is drilled in at the centre then the disc is mounted into a dremmel with a sanding drum attachment. You then get perfect chamfers. I also used carbon tow on the lip of the mount to give it more material.
I reinforced the motor area with one more layer of heavyweight glass. It's not stricly necessary because the fuse isn't thin. I'd omit this if you're going to glue in your servo tray - that will lock down the entire nose section adequately.
I've reinforced because I've had a nosecone break off on me mid-flight because of an unbalanced prop. I'm also using a removable servo tray, and I may eventually need to cut some cooling vents in that area too.
sigpic
... Why does everything I think I need always come with batteries?
John Mayer
Comment
-
c'mon, just skip to the end where we don't crash"Always fly with a responsible attitude. You may think that flying low over other people’s heads is proof of your piloting skill; others know better. The real expert does not need to prove himself in such childish ways..." - the Multiplex Build Manual
Comment
-
Servo tray mounting
I made a removable servo tray with glassed 4mm ply. It slides into place.
You can see the nocks in the fuse in the pics below. Chamfered basswood mounts were glued to the sides of the fuse to hold the screws. Holes were predrilled, then soaked with thin CA for split resistance. On hindsight, ply would have worked better, and blocks of epoxy putty would've saved me some sanding to fit curve of the fuse.
Here's the important build tip:
Trial fit all your electronics for CG before you glue things in. Don't blindly trust the website pictures for battery, ESC and servo placement.
In my build, a larger battery like a 3800 or 4000mah 3S1P lipo must sit far back in the canopy. Heavier batteries will need to be tucked right into the fuse. In the OK model pictures, the battery is far forward.
I followed the pictures on the web, and I needed up to 100g of tail weight to balance to 88mm behind leading edge. And there's no place for tail weight.
I found this out the hard way. My tray (shown) was too high in the fuse, too short to balance. Mount your tray long, low and rearward to give you maximum CG versatility.
NB: I wondered why the original control rods seemed a bit heavy. Could have been meant to compensate for tail weight.
I'll be redoing my tray. Sleepless in Singapore again.. or perhaps unhappy in acetone.
sigpic
... Why does everything I think I need always come with batteries?
John Mayer
Comment
-
More pics of the V-tail. I greased the steel V tail mounting rods. Hate to have them rust in place!
For control horns, I used 3mm stainless steel rod which is easier to bend into shape to get the right rod angle. 3mm piano wire would've been a nightmare.
The brass ball from a sullivan balljoint was then fixed into place and polished - then lubed with good old fluid film. These should stay shiny even in our humidity.
sigpic
... Why does everything I think I need always come with batteries?
John Mayer
Comment
-
Servo bays
Aileron bays are thin, even with a bulge moulded in. 11mm, that's all there is, only enough height for the servo and mounting tape. Flap bays are a mil or so roomier.
Strips of glass reinforced ply was glued into each servo bay to support the four JR DS161 wing servos. In such cases, the mount is barely 4mm thick yet it needs to take screws and stress.
These mounts were made the same as the firewall: 1mm ply, lightweight glass sandwich, built up to desired height then cut with the aid of a jig. You can use CA in place of epoxy for small jobs. There's a chamfer in the corner of the mount in just in case I need to debond and remove.
sigpic
... Why does everything I think I need always come with batteries?
John Mayer
Comment
-
Wiring 4 servo wings with a 4 pin connector
I've used a simple but effective connector in a custom harness: These connectors are perfect. Get them from Sim Lim towers.
They're much larger than standard servo conenctors. The pins are stronger and about 10mm in length. they click lock gently and are more tolerant of movement than common MPX connectors. They're cents a pair. They're made of nylon, so can be roughened and mounted to fixed surfaces- I've done so with a Cularis (a big foamie) - but for now, it'll be loose in wing.
sigpic
... Why does everything I think I need always come with batteries?
John Mayer
Comment
Comment