Announcement

Collapse
No announcement yet.

Nutmeg sailplane

Collapse

Zenm Tech Pte Ltd

Collapse

Visit Zenmtech at rc.zenmtech.com

X
 
  • Filter
  • Time
  • Show
Clear All
new posts

    Nutmeg sailplane

    Recently, I have a lot of successes and fun with my Hi-start and aerotow sailplane flyings. After spending the entire afternoon painting my room yesterday, I finally got a whole day for myself today and I started to do some simple housekeeping in my workshop cum studyroom.

    After clearing one of my work bench, I spotted a pair of half built wings sitting at one corner which I left off some months ago. With the plans still pinned on the building board, I suddenly got the 'kick' to pickup where I left off. The wings belong to a Pilot's Nutmeg lazer cut glider kit which the box was left directly under the work bench. After dusting off the area, I opened the box and started working on it again.

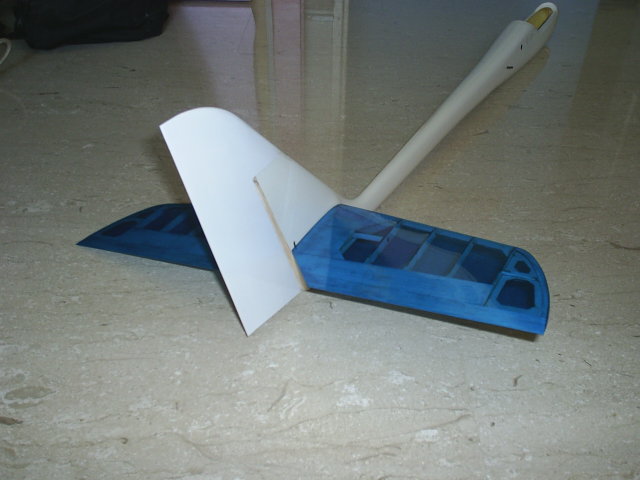
    Just for short intro to this model, this glider has the wingspan of 2 metre and uses at least 3 channels on rudder,elevator and spoiler for pure glider version. For powered version, another channel is required for throttle control. The elevator control is via all moving horizontal stabilizers. The nice and tall rudder has a horn at the tip which will reduce the strains on the rudder servo. The spoiler is a old-fashioned 'barn-door' flap type blades which stick out into the airstream when deployed via an old-fashioned 'pull-string' system. However, I think the main selling point on this glider is a nicely moulded composite fuselage. The wings and tails are fully built-up structures.

    Last edited by joe yap; 11-06-2007, 09:27 PM.

    #2
    I left off the wings most of the heavy work done. The left inboard panel still had a lot more work to do though. Within 2 hours, I have completed most of the structure but decided to leave the top sheetings of both inboard panels off, until I made some modification on the spoiler actuation. Although the plan has some minor dimensional differences with the parts, the laser-cut parts fit nicely like other Pilot kits and the everything falls into place rather quickly.

    The original design uses the traditional 'pull-string' spoiler system which relies on rubber bands to stow the spoiler. I never quite like this system as rubber band will decompose in time and rigging and de-rigging is required everytime the wings are seperated or mated with the fuselage.

    I intended to use 2 pico servos installed within the wings for the spoiler actuation. However, I only have 1 servo at this point of time and the work can only be continued after I get myself another one. So, I moved on to the empennage.

    Comment


      #3
      The empennage is not challenge as all parts fitted to each other like gloves. In no time, the horizontal stabilizers are done, followed by the rudder.

      Comment


        #4
        The nicest thing in this kit is the beautifully moulded fuselage. The plywood reinforcements are already pre-installed within the fuselage in factory. The rudder and elevator pushpull rods and sheaths are also pre-installed.

        The elevator pushpull wire just need to be Z bend on the tail end and connected to the stab bellcrank, before the pivot pin can be installed in place. Once it's done, a few drops of CA will hold it in place and the balsa fin TE post can be permanently glued in place.

        The CF wing rod tube and the carbon incidence pin just need to be installed into the fuselage centre section into the pre-drilled holes. The plastic canopy can be easily trimmed out with a pair of snips.

        Comment


          #5
          Originally posted by joe yap
          The nicest thing in this kit is the beautifully moulded fuselage. The plywood reinforcements are already pre-installed within the fuselage in factory. The rudder and elevator pushpull rods and sheaths are also pre-installed.

          The elevator pushpull wire just need to be Z bend on the tail end and connected to the stab bellcrank, before the pivot pin can be installed in place. Once it's done, a few drops of CA will hold it in place and the balsa fin TE post can be permanently glued in place.

          The CF wing rod tube and the carbon incidence pin just need to be installed into the fuselage centre section into the pre-drilled holes. The plastic canopy can be easily trimmed out with a pair of snips.

          are u goin to fly this with power or pure wind gliding?
          -Ehawk 2000 Pro
          -Mouton 1600 EV
          -AMD micro chili
          -HK Kinetic800
          -SF Learjet45

          Comment


            #6
            very nice fuselauge

            You think is possible to get us a pic of your "workshop" for us to see. Sure is interesting manz

            Cheers

            Mike

            Comment


              #7
              Originally posted by Touch n Go

              are u goin to fly this with power or pure wind gliding?
              Pure glider, for hi-start launches.

              Comment


                #8
                Originally posted by HZM
                very nice fuselauge

                You think is possible to get us a pic of your "workshop" for us to see. Sure is interesting manz

                Cheers

                Mike
                Nothing really interesting actually. Just 2 working benches, many drawer units and piles of airplanes and dust. The only powered tool I own is an electric drill.

                Comment


                  #9
                  The tail assembly is covered with transparent blue Oracoverlite and white Monokote.

                  Comment


                    #10
                    I am going to show my CO what the fellow fliers have for their workshop. Think Joe's workshop a good benchmark
                    So when I start expanding my territory, then I'll take his and complain and " see, I'm alot tamed than him "

                    Comment


                      #11
                      I have just encoutered a potential problem with the stabilizer actuation design. The all moving horizontal stabilizer is actuated via an aluminium bellcrank which is pivoted by a 4mm OD and 3mm ID aluminium tube that goes through it and both sidesof the fuselage tail. After playing some 40-50 cycles on the actuation system, the bellcrank started to bind and the linkages became very stiff.

                      I suspected that the thin aluminium bellcrank started to bite and chaff into the surface of the soft aluminium pivot. After removing the entire linkage from the fuselage, my suspicion has been confirmed. I went so bad that I couldn't even push the pivot out of the bellcrank and I have to resort to cutting the pivot free from the assembly.

                      To rectify the problem, I went down to Art Friends at Bras Basah to purchase a 4mmOD/3mmID brass tube and another 4.5mmOD/4mmID brass tube. The aluminium pivot tube is replaced by the 4mm/3mm brass tube. The harder brass tube will resist the cut done by the aluminium bellcrank. However, I felt that the system can further be improved simply by installing a 'bearing' on the bellcrank. So I enlarged the hole in the bellcrank and inserted a small piece of 4.5mm/4mm brass tube with CA. Then, I install the bellcrank in the fuselage with the brass pivot tube. Now the 'bearing' is taking the load instead of the bellcrank itself, which produces a very smooth joint without any sign of binding or chaffing.

                      Comment


                        #12
                        Hey HotdogBun,
                        the difference is Joe has his wife full support in this hobby.
                        You can risk telling your CO about your expansion plan, but you may end up eating Hot dog for the rest of the month... Ha...
                        IN Chinese they say, "same people, different life"


                        Hey Joe,
                        are we going to see this new plane in the sky tomorrow morning?

                        By the way, cool plane. Wanted to get it, but find it a bit expensive.
                        Hope to see you fly it soon.

                        Originally posted by HotDogBun
                        I am going to show my CO what the fellow fliers have for their workshop. Think Joe's workshop a good benchmark
                        So when I start expanding my territory, then I'll take his and complain and " see, I'm alot tamed than him "

                        Comment


                          #13
                          Originally posted by mave
                          Hey HotdogBun,
                          the difference is Joe has his wife full support in this hobby.
                          You can risk telling your CO about your expansion plan, but you may end up eating Hot dog for the rest of the month... Ha...
                          IN Chinese they say, "same people, different life"


                          Hey Joe,
                          are we going to see this new plane in the sky tomorrow morning?

                          By the way, cool plane. Wanted to get it, but find it a bit expensive.
                          Hope to see you fly it soon.
                          Nope, it won't be ready for tomorrow, but I have already rigged up my bashed up Multiplex Easyglider for Aerotow tomorrow.

                          It's a little pricey compared to the others but I think it's worth the moulded fuselage you'll pay for. I'll last a lot longer than a wooden one. There are also a lot cheaper glider kits to consider anyway. I'm still very tempted to get a Sentoso but decided to hold on for other projects to come on.

                          Hotdog,

                          Get your wife involved in this hobby and it'll go a long way.

                          Comment


                            #14
                            Originally posted by joe yap
                            Nothing really interesting actually. Just 2 working benches, many drawer units and piles of airplanes and dust. The only powered tool I own is an electric drill.
                            ya lah, reason is bcos to show my CO that my friend got such a big workshop, mine so small.... so she shouldnt KPKB

                            Thanks for sharing

                            Mike

                            Comment


                              #15
                              This is a deviation from the original design. The plan shows a pull-string actuation system for the spoiler deployment and a rubber band to slow it. I replaced the system with a pair of GWS Pico F servos, directly linked to the spoiler horns. To do that, first I'll have to make a series of holes on the ribs for the servo wires. Then, I temporarily taped the spoiler blades to the wings and connect the linkages to the servos. The 2 servos will be connected to a Y-harness and the throttle channel of the receiver. As such, they have to be synchronised and rigged mechanically, or it'll be too late to correct later. The pushpull rods has a kink on each of them to allow me to adjust the length fro rigging. With the radio turned on and the spoiler in full stow position, I epoxied the servos onto the wing lower skin while holding them in place. f course, I have to do one side at a time in this case. Once the epoxy has cured, I moved on to the other. A final deployment check and I'm happy with it. I then unplugged the servo leads and turned off the radio.

                              I save the closing up of the wing forward box for some other days as I have to prepare to go to work now.

                              Comment

                              Working...
                              X