Announcement

Collapse
No announcement yet.

Screamo Mini Wing build thread

Collapse

Zenm Tech Pte Ltd

Collapse

Visit Zenmtech at rc.zenmtech.com

X
 
  • Filter
  • Time
  • Show
Clear All
new posts

    Screamo Mini Wing build thread

    Hi all, I will be building this wing as quickly as I could real time to highlight pictures, videos and answer to queries etc.

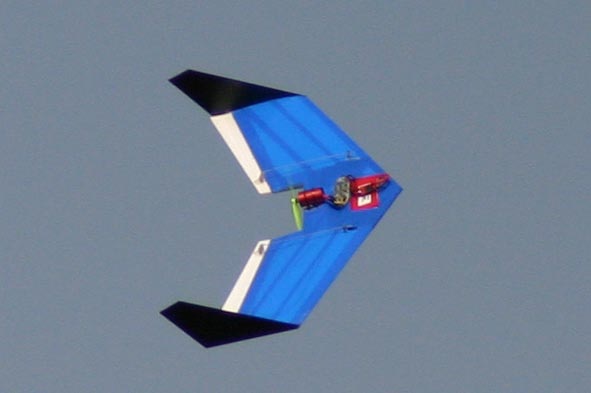
    Introducing, "Screamo Mini Wing"

    22 inch only, 225- 250 grams, runs on spd 300 motor with 4 inch prop or brushless if you want to go faster than already fast. It is quite nearly indestructible, maybe the odd chances of changing a new prop or taping your winglets again. The picture you see of the wing flying has met a wall headon, landed on a rooftop, made 2 impressions on the Punggol field and is still flying and looking nice with just 2 changes of push on props.

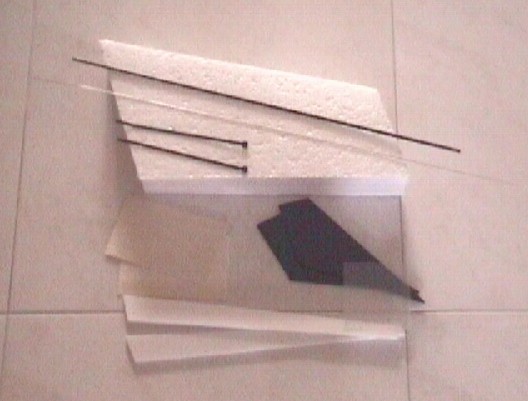
    Kit will be bare basic and includes:
    - EPP wing cores
    - Depron elevons
    - Coroplast winglets
    - 2 cable tie
    - Balsa sheet and plastic sheet
    - Instruction manual with pictures

    Price - $45

    You will need your own electronics, 2 servos, 1 mini receiver, ESC and a spd 300 or brushless power setup. 1250 20c 2s lipo is strongly recommmended for optimal performance.

    I have a list of people who are interested so far, please pm me if you are not in the following list or I included your name wrongly.

    - Astroboy
    - Airborne
    - Art
    - Wish
    - Jcho
    - P4CM400


    note: I will be posting suitable power setup that I have tested detailing battery type, prop size and motor.

    Stop looking for a gyro in my plane, they are all in the head.

    #2
    Video link

    Click here to see a video of how it flies like. Rolls like crazy (bet you can't keep up), flies fast and is louder than before lol.

    Flight Video 14.3 MB
    Stop looking for a gyro in my plane, they are all in the head.

    Comment


      #3
      Update on kit content

      Kit is not boxed and done away with all the usual packaging to keep cost to a minimal.

      Kit includes:

      - Wing cores EPP
      - Coroplast winglets
      - Depron elevons
      - Carbon rod
      - Control rods
      - Cable ties
      - Plastic piece & balsa piece
      - Instruction manual download


      Following is optional, please request specifically your need:

      - Control horns with screws ($3)
      - Black, Red or Blue Strapping tape ($3 each roll)
      - Prop rubber adapter for 2.3 & 2.0 mm shaft (50 cents)
      - 4030 yellow, 5043 orange, 5030 orange, 4025 orange prop ($1 each)
      - 77m Spray (need to find out pricing)

      Stop looking for a gyro in my plane, they are all in the head.

      Comment


        #4
        Joining wing cores

        Remove wing cores from the bedding


        Join them together using epoxy glue or 77m Spray, remember to allow a few mins of interval before joining if using 77m spray.


        Sand the cores using fine grit sandpaper to remove all slags, if you put in some efforts here to smoothen out rough surfaces, the covering will look much better and smoother.


        Proceed to trial fit the Carbon rod into the precut spar slot. You may need to do some filing to trim the length a little so that the spar will sit in as much as possible. Use epoxy glue and apply the spar slot first before inserting the carbon rod. Wipe off excess and let cure. When that is done, use more epoxy to fill the small gaps along the spar slot if there are any and at the ends of the wing tips (important for strength).

        Stop looking for a gyro in my plane, they are all in the head.

        Comment


          #5
          Covering

          Next we will tackle covering. We will install the components later by cutting through the covering directly. It makes for a more uniform and neater appearance.

          Step 1 - Spray the underside of the wing cores with 77m spray. Keep moving to prevent fluid buildup and let rest for 5 mins minimum.


          Step 2 - Start covering with strapping tape colour of your choice from the leading edge. Do not overlap, just align it as close as possible to leading edge.


          Step 3 - Start strapping it upward to trailing edge overlapping just be a little over the first tape. Use your hands to smooth outward any wrinkles.


          Completed side


          Do the same with the other side


          Trim off edges carefully with your hobby knife or scissors.

          Stop looking for a gyro in my plane, they are all in the head.

          Comment


            #6
            Battery compartment

            Measure 3.25 cm from the wing's nose, make a marking. Take your battery ( recommended 1250 2 cell Kokam, 70 odd grams) and trace the outline of it sitting it as centred as possible. Make sure to use the marking you marked earlier as a guide.


            Use hobby knife to cut the marked battery compartment. Cut right through.


            Remove the cutout. Take balsa sheet provided and cut to size of about 9.5 cm by 8.5 cm. Marked the balsa sheet as shown in the pic below.


            Cut the marked area of the balsa sheet to follow the sweep of the wing. Spray it thoroughly with 77m Spray and let rest for 5 mins.


            Apply the prepared balsa sheet carefully over the battery compartment area. See pic below for bottom and top view respectively.

            Stop looking for a gyro in my plane, they are all in the head.

            Comment


              #7
              Putting in electronics

              OK, now to focus on the topside of the wing. Place the mini receiver just slightly above the battery compartment and trace out the outline.


              Carefully make a cut just deep enough for your receiver to sit in, do not cut through.


              Pull out the foam using needle nose pliers. It will come out nicely if you make the cut squarely meeting all edges.


              Sit in your receiver and start to make a long cut to sit in your receiver. This part needs some careful considerations, you have to route your antenna around avoiding the servo areas and motor mount cut out areas.


              Do the same cut to sit in your servos. See the picture below to have an idea of where to place them. It should be 12 cm apart sitting just above the battery compartment line.


              Stop looking for a gyro in my plane, they are all in the head.

              Comment


                #8
                Covering continued

                Remove the Servos but leave the receiver and antenna in place. Tape something over the receiver to protect it and proceed to spray the topside of the wing with 77m Spray.


                After let dry for about 5 mins, proceed to cover the plane with the first strap like the picture shows below. Do now worry about servos, for now only the receiver and antenna should be in place (receiver should not be glued on yet, just in place).


                Then use a hobby knife to slowly cut the tape covering servo areas, battery compartment and receiver area. Do the same with the other half. You can use some taping to tape around the inside of the battery compartment at this point. Don't forget to trim off excess tape at the wingtip and trailing edges.


                Proceed to tape the bottom side of the plane where the balsa sheet area is. Do a good job here, you can do with some good wrinkle free taping that adds strength to the balsa sheet.


                Once you are done, you are now ready to tape up the leading and trailing edges, This step requires some overlapping of both topside and bottom, this will add strength to the overall wing frame.


                The end result should look like this.

                Stop looking for a gyro in my plane, they are all in the head.

                Comment


                  #9
                  Look for the cut you made earlier for the routing of the servos wires to the receiver and remake the cut through the tape.


                  Glue your servos into place with a little epoxy.


                  Route your wires to the receiver in the cutting and tape the servo area exposing only the control horns.


                  Take your elevons and sand them the edges as shown below


                  Use hinge tape or fiber tape to secure your elevons to the wing.

                  Stop looking for a gyro in my plane, they are all in the head.

                  Comment


                    #10
                    Winglets, battery compartment velcro and motor cutout

                    Tape the winglets provided with vinyl tape along the edges all round except for the bottom side


                    Epoxy on your winglets and use some fiber tape to reinforce it as shown below


                    You can stick a piece of velcro at this point into your battery compartment and use the other mating part for your battery for easy removal. It is debatable as to what is the best method of doing this but test flights have shown this method to be sufficiently adequate for 2 cell 1250 Kokam 20C lipo. If you are using a different battery setup or feel like doing it your own way, go ahead. See example below


                    Next, draw out the dimensions as shown in the picture below and cut it out carefully. This dimensions allows the proper clearance of a 4 inch propellers and allow proper CG placement for a typical spd 300 motor weight. If you are using a different setup that may otherwise influence the CG placement, skip this task first. Install everything there is like control rods and horns with battery first and work out the best cutout dimension later.

                    Stop looking for a gyro in my plane, they are all in the head.

                    Comment


                      #11
                      Hi Edmond,

                      Can you share where is the CG located?


                      Thanks
                      JCho

                      Comment


                        #12
                        CG location

                        Hi Jason,

                        at 25% Mac, you can range your CG from 10.65cm to 10.75cm. 10.75cm gives very sensitive control so you may want to dial in exponetial rate of about 40-50% negative for elevon controls.
                        Stop looking for a gyro in my plane, they are all in the head.

                        Comment


                          #13
                          Building continued

                          Ok, now to tackle the control rods and horns. You can bend the control rods with a V bend like the picture shown below or leave it straight if you are using a allen screw tightened bolt unit.


                          Install the control rod onto the servo and line it down to the control surface and install your control horns. Just use excess control rod wire to poke through the soft depron elevon for screw hole.

                          Stop looking for a gyro in my plane, they are all in the head.

                          Comment


                            #14
                            Power system installation

                            Get your brushed or brushless power system ready like the picture as shown below (ESC and motor connected or soldered).


                            Connect the ESC to the receiver and proceed to stuff in as much of the wire as you could. You may want to cut a little more area at the receiver side for the excess wires to sit in. Be careful though not to cut your antenna line or servo line that is already embedded in.


                            Take the supplied plastic piece and cut to the shape like the picture show below. You will need two of those for the top and bottom side. Depending on your motor thickness, make four holes in the plastic piece and through the wing. Take note of the carbon rod spar embedded when you are making the holes.


                            Insert the 2 cable ties supplied from the top of the wing first through a plastic sheet, then the wing and through another plastic piece at the bottom. See pic below for details.


                            Put your motor in place and tighten the cable tie just enough to secure it in place. Cut away the excess cable tie. Also, you can use velcro to secure your ESC over the top of the receiver at this point.


                            Your completed wing should look like this

                            Stop looking for a gyro in my plane, they are all in the head.

                            Comment


                              #15
                              Update on motor mount

                              Check your motor thrust line orientation. It should should be straight not pointing left or right with neutral vertical thrust line. Tighten either cable tie to achieve your thrust line orientation. A bit of upthrust is fine but not downthrust.

                              Stop looking for a gyro in my plane, they are all in the head.

                              Comment

                              Working...
                              X