Announcement

Collapse
No announcement yet.

Wing Repair Advice

Collapse

Zenm Tech Pte Ltd

Collapse

Visit Zenmtech at rc.zenmtech.com

X
 
  • Filter
  • Time
  • Show
Clear All
new posts

    Wing Repair Advice

    Hi guys,

    I am currently slowly repairing my plane's damaged wing after months of collecting dust
    Most of the repairs are straight forward but for one of the section, I am not too sure of the best way to go about repairing it.

    The section in question is the wing bolt area. The bolt ripped through the hole. From the pictures I attached, the area is built out of a wedged section of balsa running the whole length of the TE of the wing.

    It seems like a high stress area so I am wondering if I can just cut a small section where the hole is and replace it by a new section and still be strong enough...

    OR

    do I need to replace the whole length of the "wedged" piece of balsa?

    Thanks,
    Fit

    -Feda Dragonfly
    -Hornet 2
    -Pilot OK Turmeric
    -Zoom Zoom 4D
    -Sceadu EVO 50: OS50, Hatori521, Revmax,
    -Hornet X3D
    -Hornet X3D (yet to setup!)
    -Formosa 1
    -World Models Spot On 50
    -HB King 2
    -World Models Groovy 50 F3A
    -RICCS F18 EDF

    Controlled by 9CHP
    (Temasek Poly AMIG)

    #2
    replace all

    i would suggets replacing the whole piece using plywood for added strength.


    romihensem " Back In Business "

    Flying is all that matters...
    sigpic

    Comment


      #3
      yeah... i concur with romi. but if it;s too much trouble.

      you can try dry fitting the wing first. smoothen the joints and the surface, ensure no splinters are loose. Cut out small loose splinters. leave the large one as they are

      next you apply epoxy all over the joint, make sure all the large splinters are held down by the epoxy. Join back the wing as done in assembly. If you have epoxy which oozed out, spread them across the surface to form a layer above the crack line.

      when the epoxy drys, you can either cut a slit through and reinforce with a carbon-sift. Or simply just sand down which ever surface your not satisfied with.
      If your not doing crazy stuff, i the epoxy should hold. But if your doing crazy stuff reinforcing it would be better.

      Do remember to balance the plane by trimming or adding weights. The amount of epoxy used may change your flight characteristics a little if your plane is light.
      DUCT DUCT DUCT GO!!!!

      Comment


        #4
        Fit,

        is that a wing from a High wing trainer?

        On the repair, i would suggest u cut out the damaged trailing edge (TE) "wedge" which is probably standard TE stock u can get at LHS. Cut out just enough to remove the damaged balsa. Glue in TE stock of correct dimensions and sand smooth. Next, get 1/16 ply (small plane) or 1/8 ply(bigger planes ) to over lap the glued in TE balsa stock on the top. Overlay by at least 1/2" on all 3 sides (less the TE) and use expoxy for this.
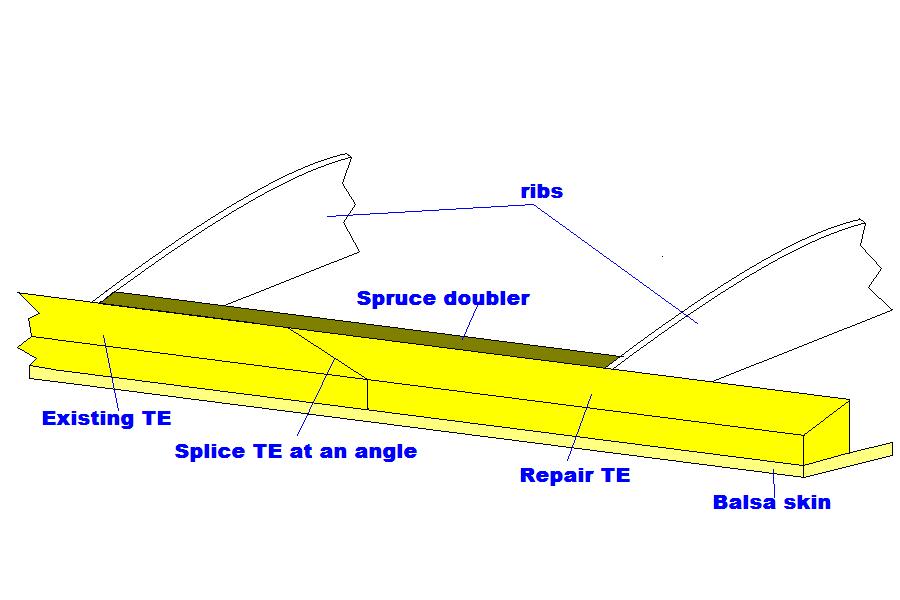
        hope this helps

        Comment


          #5
          Thanks for all the suggestions bros.
          I will probably go for Gecky's idea as its the least troublesome.
          To replace the whole length of the TE would be a lot of hardwork and a lot of covering to be redone.

          BTW, its a Spot On 50 wings.

          Thanks!
          -Feda Dragonfly
          -Hornet 2
          -Pilot OK Turmeric
          -Zoom Zoom 4D
          -Sceadu EVO 50: OS50, Hatori521, Revmax,
          -Hornet X3D
          -Hornet X3D (yet to setup!)
          -Formosa 1
          -World Models Spot On 50
          -HB King 2
          -World Models Groovy 50 F3A
          -RICCS F18 EDF

          Controlled by 9CHP
          (Temasek Poly AMIG)

          Comment


            #6
            Hi Fit,

            Your pictures does not show the overall view of the wings, as such I can only provide some information. From the detail pictures, apart from the TE itself, it also seem like the wings are split into 2 at the centre, or are they supposed to be 2 piece wing in the first place?

            For splicing the broken TE, although you do not need to replace the entire length of it, I'll suggest you cut alt least about 1 foot away from the centre. The inboard most area of the TE towards the centre is highly stresses with the wings are subjected to bending loads and as such, splicing around there should not be a good idea.

            If I were you, I'll cut it about 1 foot away from the centre at an angle instead of a straight 90 degrees cut. Choose a piece of balsa strip, as hard as possible, and cut one end at the same angle as the one you did on the damaged TE. Pin the wings on the building board and make sure the TE sits flatly on it. Splice join the new TE onto the rest of the existing on while making sure it is straight. To ensure the load is spread evenly between the 2 parts, epoxy a piece of spruce onto the forward side of the joint,( say about 1/8" thick and the width same as the TE thickness. Replace or glue back the ribs and re-sheet the balsa skin as necessary.

            As for the centre wing joint, epoxy the 2 wings together and wrap the joint with medium weight ( 1.5-2oz/sqft) fibreglass cloth, soaked with thinned or laminating epoxy. If the mounting holes for the wing bolts got pulled through previously, fill them up with a mixture of epoxy and microballoons and re-drill the holes after it has fully hardened up. Don't forget to add a piece of plywood bearing plate over it as you do not want the mounting bolts to crush into the wing structure.

            Comment


              #7
              Thanks Joe for the illustration. Understood what you mean..
              Good idea on the cutting at an angle..
              Only worried that I may not be able to cut the other piece at the same angle to match each other so that they will butt up and be straight.

              Yup... you are right... Its actually a one piece wing. But the crash split the wings at the center joint. Will take more pics of it and post it here.
              There is also damage on the fuselage. As I run into problems I will post it here
              -Feda Dragonfly
              -Hornet 2
              -Pilot OK Turmeric
              -Zoom Zoom 4D
              -Sceadu EVO 50: OS50, Hatori521, Revmax,
              -Hornet X3D
              -Hornet X3D (yet to setup!)
              -Formosa 1
              -World Models Spot On 50
              -HB King 2
              -World Models Groovy 50 F3A
              -RICCS F18 EDF

              Controlled by 9CHP
              (Temasek Poly AMIG)

              Comment


                #8
                Hi Fit,

                It is not as difficult to cut the splice at at angle. Take a piece of mini hacksaw blade, break away one end so that it does not have a holding pin to obstruct you. Saw the repair TE at an angle first, then place it over the existing TE and pin it down. Using the previously cut surface of the repair TE as a guide and saw the existing TE.

                As I said before, do not splice the TE too near the centre of the wing. I did that to my first trainer, and it broke up in flight from there.

                Comment

                Working...
                X