Announcement

Collapse
No announcement yet.

Build Log - T45 Goshawk Sapac from RC-Warbirds.com

Collapse

Zenm Tech Pte Ltd

Collapse

Visit Zenmtech at rc.zenmtech.com

X
 
  • Filter
  • Time
  • Show
Clear All
new posts

    Build Log - T45 Goshawk Sapac from RC-Warbirds.com

    Time for a new EDF!

    After doing some research, I have decided to buy the Sapac T45 Goshawk from RCWarbirds. With some poisoning and somemore viral poisoning, Punggol Aeromodelling Club (PFW) bought a total of 8 T45 Goshawk kekeke.

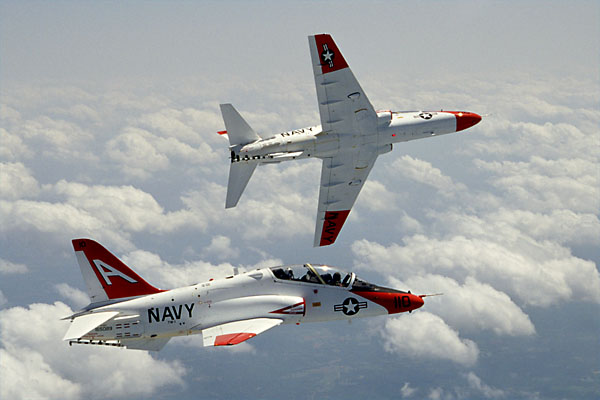
    Here's some pictures of the real stuff!


    Planned setup:
    4 x HS125 for ailerons/flaps
    1 x HS85MG for Elevator
    2w30 on 6904 6s 3000mah Jeti 66 Spin powerplant
    BEC/ Regulator ? Undecided
    Retracts? Undecided, may not want to do that
    Rudder? Undecided, not really crucial

    I have taken some pictures of the kit's content and various closeups. Enjoy!

    The entire fuselage is made of fiberglass with balsa sheeted wings. This v2.1 has several improvements over the previous models. Flaps are built in, rudder is optional and the manual is over 60 pages long, very clear and informative. All the hardware are provided for, even the ducting for the exhaust are included.


    The kit is v2.1, this means that the wells and structure for the retracts are already thought out and catered for, check out the nice nose retract support, very well thought out!


    The fiberglass ducting. To fit the HET 6904, some work is needed to trim the inside of the ducting to make clearance for the 6904 impeller cone, I thought Sapac could have designed it a little better and simply merge the 2 intakes into 1 cleanly so that there won't be this funny meet up between the 2 intakes ducting that needs some work to fit non Sapac fans.


    Intakes of the T45, nicely rounded.
    Last edited by edmond22; 29-05-2010, 01:37 AM. Reason: Updating pictures of t45
    Stop looking for a gyro in my plane, they are all in the head.

    #2
    haha

    Originally posted by edmond22 View Post
    Time for a new EDF!

    After doing some research, I have decided to buy the Sapac T45 Goshawk from RCWarbirds. With some poisoning and somemore viral poisoning, Punggol Aeromodelling Club (PFW) bought a total of 8 T45 Goshawk kekeke.

    Planned setup:
    4 x HS125 for ailerons/flaps
    1 x HS85MG for Elevator
    2w30 on 6904 6s 3000mah Jeti 66 Spin powerplant
    BEC/ Regulator ? Undecided
    Retracts? Undecided, may not want to do that
    Rudder? Undecided, not really crucial

    I have taken some pictures of the kit's content and various closeups. Enjoy!

    The entire fuselage is made of fiberglass with balsa sheeted wings. This v2.1 has several improvements over the previous models. Flaps are built in, rudder is optional and the manual is over 60 pages long, very clear and informative. All the hardware are provided for, even the ducting for the exhaust are included.


    The kit is v2.1, this means that the wells and structure for the retracts are already thought out and catered for, check out the nice nose retract support, very well thought out!


    The fiberglass ducting. To fit the HET 6904, some work is needed to trim the inside of the ducting to make clearance for the 6904 impeller cone, I thought Sapac could have designed it a little better and simply merge the 2 intakes into 1 cleanly so that there won't be this funny meet up between the 2 intakes ducting that needs some work to fit non Sapac fans.


    Intakes of the T45, nicely rounded.
    haha! is 68 pages for the manual

    Comment


      #3
      my setup.

      My setup:-

      Planned setup:
      2 x HS65MG for Ailerons
      2 x HS82MG for Flaps
      1 x HS85MG for Elevator
      2w20 on 6904 4s 3700mAh Kontronic 80A powerplant
      Bec/Regulator- decided intall a Regulator
      Retracts-decided no Retracts
      Rudder-decided no Rudder

      Comment


        #4
        Edmund - Its gonna be one hell of a fast flyer again

        Flight videos coming up soon?
        The Joker, "I may be crazy enough to take on Batman, but the IRS? Noooo!"

        Comment


          #5
          Haha saw them collected last night.
          Don't worry tomorrow morning you see it maiden.
          The build is as fast as it flies.....

          F22 burning his afterburner...

          Comment


            #6
            I live too far from Punggol.. morning flight means pitching a tent out in the field tonight lol

            like that i'll have to suffer the videos until i have a driving license
            The Joker, "I may be crazy enough to take on Batman, but the IRS? Noooo!"

            Comment


              #7
              Some bits done

              Not quite in the mood to build much today, too freaking warm!

              Anyhow, some bits done.

              Using a powerful light source to markout for accurate cutting of the servo area.


              Servo area all cut out, ready for servo installation


              After much trial fit and thought through, I decided to remove the HS125 bottom cover for best fit. This allows me to use the predetermined cover slot and horn slot. The manual actually recommends for the servo to be mounted to the cover and the cover is secured by 4 screws. I prefer to mount the servo directly on the wing itself using the HS-125 double sided tape. I prepared the wood surface by wicking with some thin CA, let dry and slap on the tape. I next will be gluing some wood blocks in strategic areas to prevent the servos from moving around.


              Trial fit of the cover.
              Stop looking for a gyro in my plane, they are all in the head.

              Comment


                #8
                Agreed that the weather these few days are very warm

                Servos gonna be ok with their bottom covers out like that?
                The Joker, "I may be crazy enough to take on Batman, but the IRS? Noooo!"

                Comment


                  #9
                  Originally posted by trailblazer View Post
                  Agreed that the weather these few days are very warm

                  Servos gonna be ok with their bottom covers out like that?
                  Not a problem. It is the same method used on HS125 for F5B applications when the wing fit is very tight.
                  Stop looking for a gyro in my plane, they are all in the head.

                  Comment


                    #10
                    29th Build continued

                    Found some time to continue the build today. While looking for the manual, I decided to do some triming for the ducting to accomodate my HET 6904 fan. I wished Sapac could have made this part more friendlier to fit non Sapac fans. This design coupled with the strange instructions to trim the inner area for non sapac fan drove all 8 of us who bought one nuts lol. Thank God Mr Ho have this little tool that can tackle this job of trimming. Wemotec may get away without trimming but HET 6904 has built in cone that is part of the rotor fan, some trimming is needed to accomodate that nose.


                    I also took the time to prepare my powerplant. As per my practice, the whole ESC is going to sit right in the exhaust for maximum cooling.

                    Stop looking for a gyro in my plane, they are all in the head.

                    Comment


                      #11
                      Elevator servo and linkage

                      Next tackle bit, the elevator servo and linkages.

                      I did not like the original servo mount. Doesn't feel quite strong enough for me and the size is for some reason designed for really small servo like HS65. I removed the mounting plate and fabricated my own mount. With a small ply backing, I glued that ply plate to the side of the fuselage and drilled 2 holes. The HS85 comes with this side mounting mount and I used it to good effect to arrive at a much stronger mount.

                      Note the original mount vs the modified one. Note the 2 screws from the outside, this just needs a little white paint touch up and we are done.


                      The anhedral metal rod for the all moving elevator stab is first inserted in place with the metal horn (in the exhaust). That is tightened down in place with a allen screw. 2 pieces of ply plate is then glued on at the sides. This is the opportunity to get it square with the vertical fin.
                      Stop looking for a gyro in my plane, they are all in the head.

                      Comment


                        #12
                        30th Build continued

                        Started the easy job of rolling up the duct exhaust. Sapac made it a no brainer, just roll it up in the slots, tape and CA.


                        I went back to the elevator next to finish up what I done yesterday. I did 1 side at a time. This involves cutting out the hole as specified in the manual which is meant for filling up with epoxy. Looking at the rod, I felt the designer could have opted for a simple locking mechanism like how heli keeps their flybar or paddle in place. If you look inside the horizontal stabs, that is a lot of place for the epoxy to go increasing unnecessary weight. A allen screw lock down would have been better and easier to adjust. Anyhow, I used 30 min epoxy and used some tape to hold the stab in place while filling up the hole. For better clearance, I used 2 washers on each side. I oiled them too as an insurance against the thing locking up in case some epoxy gets in contact.


                        Elevator test. Seems to work out quite well.

                        Stop looking for a gyro in my plane, they are all in the head.

                        Comment


                          #13
                          beautiful!
                          The Joker, "I may be crazy enough to take on Batman, but the IRS? Noooo!"

                          Comment


                            #14
                            With the elevator out of the way. I tackled the wing controls tonight. After much thinking, I decided I wasn't going to use the included rods. I am flying this bird without gears doing belly landing on grass, since the rods are underneath, I thought it will be a good idea to achieve 2 things. Get it as low profile as possible so that the belly of the fuselage takes the most contact with ground and beef it up more so that it can take some abuse more readily.

                            I glued in the wood blocks today too to secure the servo in the wing.


                            Comparison of the new method vs included rod.


                            Completed linkage


                            Stop looking for a gyro in my plane, they are all in the head.

                            Comment


                              #15
                              Edmond
                              Just some observation, you fill the gap around the horn is very good but you should remove the red covering slightly so the the epoxy can grip on the balsa. I know it will not look very neat.

                              Comment

                              Working...
                              X