Announcement

Collapse
No announcement yet.

Build: Topsky 3.0 Carbon Version

Collapse

Zenm Tech Pte Ltd

Collapse

Visit Zenmtech at rc.zenmtech.com

X
 
  • Filter
  • Time
  • Show
Clear All
new posts

    Build: Topsky 3.0 Carbon Version

    I attempted to do a buid thread on my Topsky 3.0 Full Carbon version from Top Soaring.
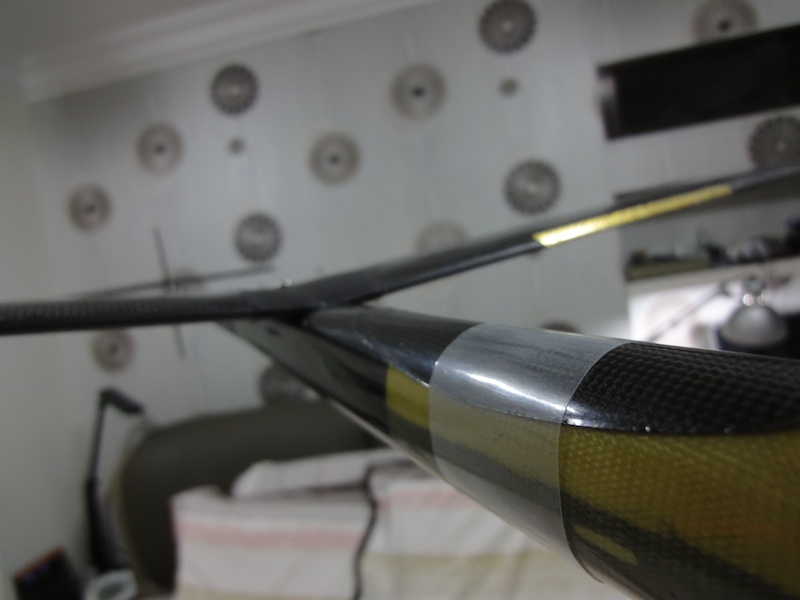
    The original kit comes with the with the Super Topsky 2.0 tails but I opted for an upgrade to the full carboline carbon tails from the Neos (Armsoar).
    The wing is bagged with 1K carbon fibre and the workmanship in my opinion is excellent. I opted for a rudderless setup.

    Click image for larger version

Name:	DSC02320.JPG
Views:	1
Size:	89.3 KB
ID:	985486

    First thing I did was to weigh everything. I mean everything......

    Left Wing - 65.2g
    Right Wing - 66.3g
    Pod - 37.0g
    Boom - 17.6g
    Rudder - 7.7g
    Elevator - 6.9g
    Accesories - 13.5g
    Wing servos - 18.3g
    Elevator Servo - 8.0g
    Battery - 21.4g
    Volatge Regulator - 5.9g
    Rx - 5.6g

    Total weight 273.4g

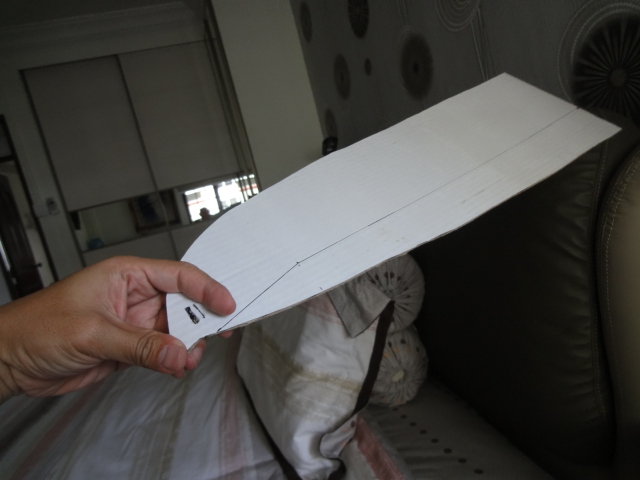
    I then started working on the wing. First off, I taped masking tape around the area where I intend to mount the servo.
    I then made mesurements and marked the servo tray. This is where I will insert my wing servo.

    Click image for larger version

Name:	DSC02322.jpg
Views:	1
Size:	148.3 KB
ID:	985487


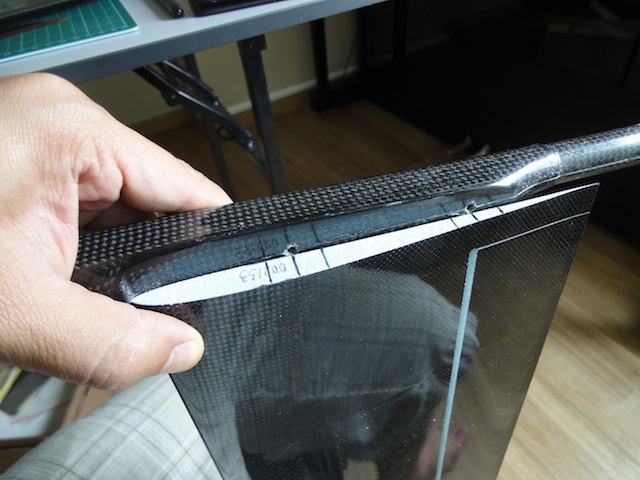
    Once I happy with the servo location, I start my nerve-wrecking cut of the skin of the wing.
    The carbon skin was really tough. Make sure that you're using a sharp pen-knife. A normal penknife
    does the job pretty well. No need expensive art knives.

    Click image for larger version

Name:	DSC02325.jpg
Views:	1
Size:	93.5 KB
ID:	985488


    The carbon skin can be easily peeled off. I just have to make sure that the cut is properly done to avoid
    unwated peeling of the skin.

    Click image for larger version

Name:	DSC02327.jpg
Views:	1
Size:	101.4 KB
ID:	985489


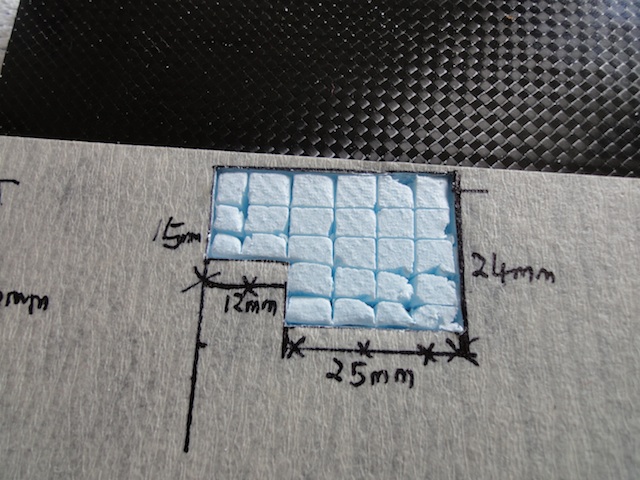
    Next... to remove the foam from the servo tray. First, we cut the foam into grids. Smaller grids will make
    the foam removal easier.

    Click image for larger version

Name:	DSC02328.jpg
Views:	1
Size:	129.2 KB
ID:	985490


    Using a sharp tool (I use a small round file), we then start scratching out the foam.
    Careful not to damage the skin of the wing.

    Click image for larger version

Name:	DSC02323.jpg
Views:	1
Size:	100.1 KB
ID:	985491


    Voila... nice and clean servo tray ready for servos to be mounted.

    Click image for larger version

Name:	DSC02324.jpg
Views:	1
Size:	123.5 KB
ID:	985492


    SG Fr3ak League : www.facebook.com/#!/groups/SG.Fr3aK.League
    BR Slopers : www.facebook.com/groups/BRslopers

    #2
    For the wing mount, we need to strengthen with epoxy. We first measure the mounting points.
    Using the pod, mark out the positon of the mounting bolt.

    Click image for larger version

Name:	DSC02321.jpg
Views:	1
Size:	96.7 KB
ID:	972381


    Using similar method for foam removal (same like the wing servo tray), we dig out the foam. Do this for both monthing bolt.
    This strongpoint is important as there will be lots of stress at this point during launch. So be sure not to skip this part.

    Click image for larger version

Name:	DSC02329.jpg
Views:	1
Size:	52.9 KB
ID:	972382


    Next... We have to prepare a channel for the servo leads. We heat a steel rod (lighter is fine) and poke through the foam
    where you intend for the servo leads to run. The hot steel rod will create a nice channel. Do plan how you want to run the servo
    leads before you actually do the channeling.

    Click image for larger version

Name:	DSC02330.jpg
Views:	1
Size:	117.1 KB
ID:	972383


    SG Fr3ak League : www.facebook.com/#!/groups/SG.Fr3aK.League
    BR Slopers : www.facebook.com/groups/BRslopers

    Comment


      #3
      The instruction manual recommends a 6.5 degree dihedral which was translated to 168mm height difference. This is measured by
      placing one side off the wing flat on the table and the other wing tip off the table by 168mm. I opted for a smaller dihedral at 162mm
      which translated to about 6 degrees. The wings ae then joint together using 30min epoxy-microballon mix.

      If you notice at the far left of the photo below, I've used a box with a marking for 162mm. This helps me to ibdicate how much to shim in order
      to get the correct dihedral angle. The amount of splooge mixture should be mixed enough to fill the strongpoints that was scratched out and the wing joint.
      Do remember wipe away the excess epoxy before it hardens. Once hardened it can be quite difficult to remove.

      Click image for larger version

Name:	DSC02331.jpg
Views:	1
Size:	79.2 KB
ID:	972390


      While waiting for the the wing joint to cure, I started to work on the tail. Unfortunately, I did not take much photos as the camera battery died.
      I'll try to explain. I first started with the rudder. I cut away about 30mm off the boom tip to reduce the weight of the boom. Flying characteristics should
      not change too much. I then cut a slot on both rudder and boom. The picture below shows the slot cut on the rudder. Hope it make sense. I then slot the
      rudder in and fiberglass the rudder into position. The finishing is rather bad the way I did mine cos I redid the rudder as it was tracking as straight as I
      wanted it to be. This is the problem of a rudderless setup. Anyway I'm happy now....

      Click image for larger version

Name:	Slide2.jpg
Views:	1
Size:	89.7 KB
ID:	972386


      I mentioned that the boom has a slot cut as well. I've indicated in the photo below. It's also important to strenghten the boom with kevlar string. You don't
      want the boom to spilt under that stress. Remember... these planes goes through tremendous stress especially during launch.

      Click image for larger version

Name:	Slide1.jpg
Views:	1
Size:	96.8 KB
ID:	972387


      After mounting the rudder, we then mount the elevator. The pylon mount height should be around 10mm. Using epoxy, the elevator is mounted. The thing to remember is to
      make sure that the decalage is parallel to the boom. Using a set square, the elevator is mounted 90 degree to the rudder.

      Click image for larger version

Name:	DSC02334.jpg
Views:	1
Size:	129.8 KB
ID:	972388


      After the tail mounting has cured. the control horn is installed. I'm using the pull spring option. The spring is bent using the control rods that came with
      the kit. A 50lb fishing line is used as my pull string. Very strong, extremely difficult to cut but easy to handle. I cut a hole in the boom for the string exit
      thru a teflon tube. The teflon tube is glued using 15min epoxy.

      Click image for larger version

Name:	DSC02357.jpg
Views:	1
Size:	70.2 KB
ID:	972389


      SG Fr3ak League : www.facebook.com/#!/groups/SG.Fr3aK.League
      BR Slopers : www.facebook.com/groups/BRslopers

      Comment


        #4
        Click image for larger version

Name:	popcorn.gif
Views:	1
Size:	2.9 KB
ID:	972393 Subscribed

        -Jonathan

        Comment


          #5
          After the wing joint has cured, excess epoxy is sanded off. The mounting bolt holes and servo leads opening is then
          drilled. Make sure is test fitted to make sure the alignement is correct. The wing joint is then patched with the 1K
          carbon fibre strip that came with the kit. Make sure the patch area is roughed up with a sand paper to get better
          adherance. This is done on both top and bottom. I think it's abit of an overkill but i don't really want to take the
          chance.

          Note: patch one at a time and let it hardened. Once hardened, drill the hole for the mounting bolt. Patch the opposite
          side and then let it hardened. Then drill the carbon fibre patch. Sorry, did not get a photo of that happening but the
          end result is shown below. If you patch both side at once, you might lose the mounting hole position.

          Click image for larger version

Name:	top.jpg
Views:	1
Size:	74.5 KB
ID:	972395
          Click image for larger version

Name:	bottom.jpg
Views:	1
Size:	75.5 KB
ID:	972396


          While waiting again for the wing joint to cure, I start work on the pod. Since this is a rudderless setup, only 1 servo
          is used. The servo tray supplied in the kit was for 2 servos (obviously), so I decided to cut the extra off. This proved
          to be a great space saving solution. I traced out the tray and kept it as record in case I decide to revert back to a
          'ruddered' setup.

          Click image for larger version

Name:	DSC02345.jpg
Views:	1
Size:	53.9 KB
ID:	972397


          Dry fit all the components into the pod. It's a real space-fest with 1 less servo. For my setup I'm using:
          - Futaba S3114 servo for the elevator
          - 350mAh 2S 7.4V Lipo
          - SVR3 6V voltage regulator
          - AR6255 rx

          All fitted in the pod. Since the battery is the heaviest, i fitted it all the was into the nose. Once I'm happy
          with the layout, I hot-glue the servo tray down.

          Click image for larger version

Name:	DSC02384.jpg
Views:	1
Size:	105.3 KB
ID:	972398


          Moving back to the wing. The servos I'm using is Tahmazo TS-D6011 Digital Servos. I really like than as they
          are flat, light and has a good torque, perfect combination as a wing servo. The servos are dropped in and
          te servo leads are pulled to the wing root via the channel that was made earlier.

          Click image for larger version

Name:	DSC02341.jpg
Views:	1
Size:	169.3 KB
ID:	972399


          The servos leads are terminated with the 4 pin micro deans plug. Weighs a whopping 1.0g on my digital scale.
          The connection method is

          Pin 1 - red wire (both servo)
          Pin 2 - black wire (both servo)
          Pin 3 - white wire (servo #1)
          Pin 4 - white wire (servo #2)

          On the wing side, male plug should be used. I somehow soldered the wrong one. This is the problem of doing
          this late at night. Anyway, it not exactly end of the world so i just left as it is.

          Click image for larger version

Name:	DSC02344.jpg
Views:	1
Size:	141.4 KB
ID:	972400


          Now come to the part I dread the most. Installing the control rods for the ailerons. I opted for a top drive
          which I love as most of the aileron controls are hidden in the wing. Bottom drive controls is simple but I've
          to remove grass from the control rods everytime she lands.... lol. Anyway, After some measurement, i made
          the markings for the control rod exit on the top panel of the wing. Using a Dremel, the exit hole is cut out.

          Click image for larger version

Name:	DSC02336.jpg
Views:	1
Size:	88.4 KB
ID:	972401


          Using a heated steel rod, a channel is made for the control rods. This is always the scariest thing to do as you're
          just hoping that the steel rod goes the right angle and the correct direction. lucky for me, it was dead on the first
          time round.

          Click image for larger version

Name:	DSC02339.jpg
Views:	1
Size:	153.0 KB
ID:	972403

          Click image for larger version

Name:	DSC02340.jpg
Views:	1
Size:	53.5 KB
ID:	972402


          SG Fr3ak League : www.facebook.com/#!/groups/SG.Fr3aK.League
          BR Slopers : www.facebook.com/groups/BRslopers

          Comment


            #6
            After the channel for the control rods are ready, ailerons is fitted with the control horn. i found
            the horns in the kit rather tall and I also wanted the 'hole' to be perpendicular to the hinge line.
            So, I decided to cut the horn down a little.

            Click image for larger version

Name:	DSC02347.jpg
Views:	1
Size:	80.9 KB
ID:	972411


            Measured and marked the control surface. Cut the slot and inatalled the horns. 1mm stainless
            steel controls rods were bent and installed. Use a tiny little bead of epoxy on the tip of the control
            rod to prevent the rod from 'coming' out. Don't forget to glue the wing servos into position to
            prevent them boucing around. I'm really 'kiasu' so I used 15min epoxy wif microballoons to make
            sure it stays rigidly in place.

            Click image for larger version

Name:	DSC02363.jpg
Views:	1
Size:	129.5 KB
ID:	972412


            Boom is then connected. Ensure that the tail elevator and wing is parallel. Eyeballing it should be
            be good enough. Used the epoxy again to glue them together. Fiberglass or carbon fibre strips
            is used to wrap the joint.

            Click image for larger version

Name:	DSC02360.jpg
Views:	1
Size:	75.3 KB
ID:	972413


            The launch peg in the kit needs to be sanded down to remove the sharp edges. This needs to be
            done so that your fingers do not get sore and cut short the gliding fun. Before i start making slots
            in the wing for the blade, I cut out a cardboard shaped of the wing. Tested the various position where
            I think the blade suits me the best.

            Click image for larger version

Name:	DSC02385.jpg
Views:	1
Size:	126.0 KB
ID:	972414


            After finding the sweet spot, a slot was cut and inserted the blade. Used the leftover 1K CF
            cloth to reinforce the launch blade slot.

            Update: 1K CF cloth was not god enough to withstand my launch style. Used a 3K patch to strengthen
            the blade area instead
            .

            Click image for larger version

Name:	DSC02364.jpg
Views:	1
Size:	95.2 KB
ID:	972415


            The TS3 wing comes with trilerons. Used a tape and tape them leaving about 15mm untaped.

            Click image for larger version

Name:	DSC02365.jpg
Views:	1
Size:	135.3 KB
ID:	972416


            I'm pretty nervous about the fact that the whole model is black. Being very bad at orientation I thought it
            would be wise to make the wing more 'obvious'. Decided to stick some shiny tapes at the bottom of
            the wing.

            Click image for larger version

Name:	DSC02366.jpg
Views:	1
Size:	101.6 KB
ID:	972417


            SG Fr3ak League : www.facebook.com/#!/groups/SG.Fr3aK.League
            BR Slopers : www.facebook.com/groups/BRslopers

            Comment


              #7
              Topsky 3 Carbon Completed!

              Click image for larger version

Name:	01.jpg
Views:	1
Size:	134.8 KB
ID:	972422

              Click image for larger version

Name:	02.jpg
Views:	1
Size:	163.1 KB
ID:	972421

              Click image for larger version

Name:	03.jpg
Views:	1
Size:	125.9 KB
ID:	972420

              Click image for larger version

Name:	04.jpg
Views:	1
Size:	77.5 KB
ID:	972419

              Click image for larger version

Name:	05.jpg
Views:	1
Size:	138.1 KB
ID:	972418


              SG Fr3ak League : www.facebook.com/#!/groups/SG.Fr3aK.League
              BR Slopers : www.facebook.com/groups/BRslopers

              Comment


                #8
                Mannz, how I envy you !


                ....I can never put my models on the bed liddat ! ...the jealous wife will surely go and destroy it.
                Seriously running out of ...Storage space !

                Comment


                  #9
                  Originally posted by Ghostfit View Post
                  Mannz, how I envy you !


                  ....I can never put my models on the bed liddat ! ...the jealous wife will surely go and destroy it.
                  No wonder she was giving me the look when I was taking the photos...


                  SG Fr3ak League : www.facebook.com/#!/groups/SG.Fr3aK.League
                  BR Slopers : www.facebook.com/groups/BRslopers

                  Comment


                    #10
                    Sherwin,

                    Put more bright stickers on the top side wing tips.... a larger area at least 25% of the wing. If not your plane will disappear when it goes below the tree line.

                    Dont ask me how I know
                    Do you feel the RUSH....!!!!

                    Comment


                      #11
                      Originally posted by Hawkeye View Post
                      Sherwin,

                      Put more bright stickers on the top side wing tips.... a larger area at least 25% of the wing. If not your plane will disappear when it goes below the tree line.

                      Dont ask me how I know
                      Really ah... How you know???? LOL

                      Ok Ok.... thanks for the tip....

                      Flew it a few times already. It dissapears when it's blends in with the HDB flats too. That's why I pasted the gold strip at the leading edge. Helped a little.


                      SG Fr3ak League : www.facebook.com/#!/groups/SG.Fr3aK.League
                      BR Slopers : www.facebook.com/groups/BRslopers

                      Comment


                        #12
                        Originally posted by sherchoo View Post
                        No wonder she was giving me the look when I was taking the photos...
                        I'll bet she was thinking "How dare you put your dirty black aeroplane so close to my lovely white LV handbag !!!"
                        Seriously running out of ...Storage space !

                        Comment


                          #13
                          You must tell her that this is the most advanced version of the "Black gold", AKA " Or-Kim", that people bid for luck during the Hungry Ghost Festival.

                          Huat Ah!

                          Comment


                            #14
                            wow the black stuff is the good stuff.

                            same as what f1 cars are made of.

                            hope it flies good
                            "Always fly with a responsible attitude. You may think that flying low over other people’s heads is proof of your piloting skill; others know better. The real expert does not need to prove himself in such childish ways..." - the Multiplex Build Manual

                            Comment


                              #15
                              Originally posted by joe yap View Post
                              You must tell her that this is the most advanced version of the "Black gold", AKA " Or-Kim", that people bid for luck during the Hungry Ghost Festival.

                              Huat Ah!
                              Better not tell her that. She'll take it downstairs and burn it....


                              SG Fr3ak League : www.facebook.com/#!/groups/SG.Fr3aK.League
                              BR Slopers : www.facebook.com/groups/BRslopers

                              Comment

                              Working...
                              X