Announcement

Collapse
No announcement yet.

F-16 scratchbuild 68mm EDF bluefoam

Collapse

Zenm Tech Pte Ltd

Collapse

Visit Zenmtech at rc.zenmtech.com

X
 
  • Filter
  • Time
  • Show
Clear All
new posts

    F-16 scratchbuild 68mm EDF bluefoam

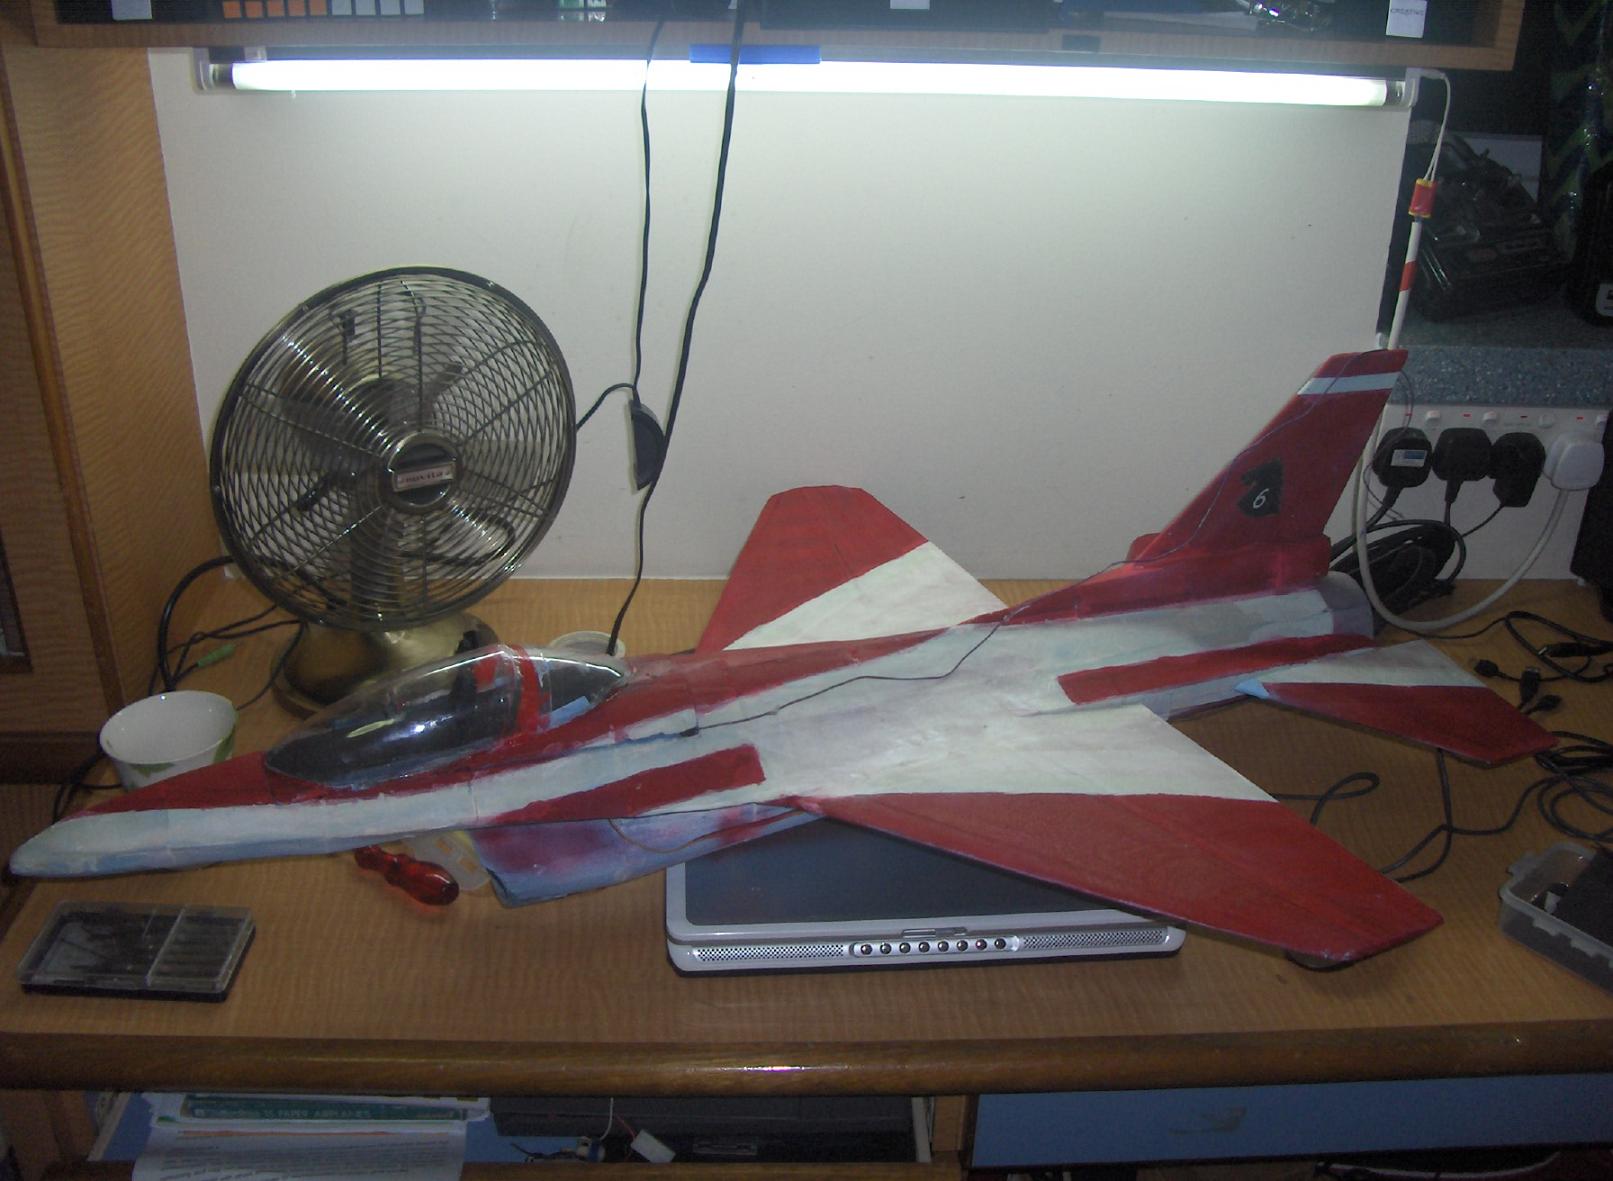
    Hi guys. This is my lastest scratch build project so far. And i must say this is one my longest project i ever planned + building. Even i set aside 5hours a day ,i took nearly 2 weeks to complete.

    My goal:
    -is to build a f-16 weighing under 700grams
    -Build it before 9th august (national day)
    -Make it as realistic as possible (looks as real as a f-16)
    -I'm going for maneuverability rather then speed
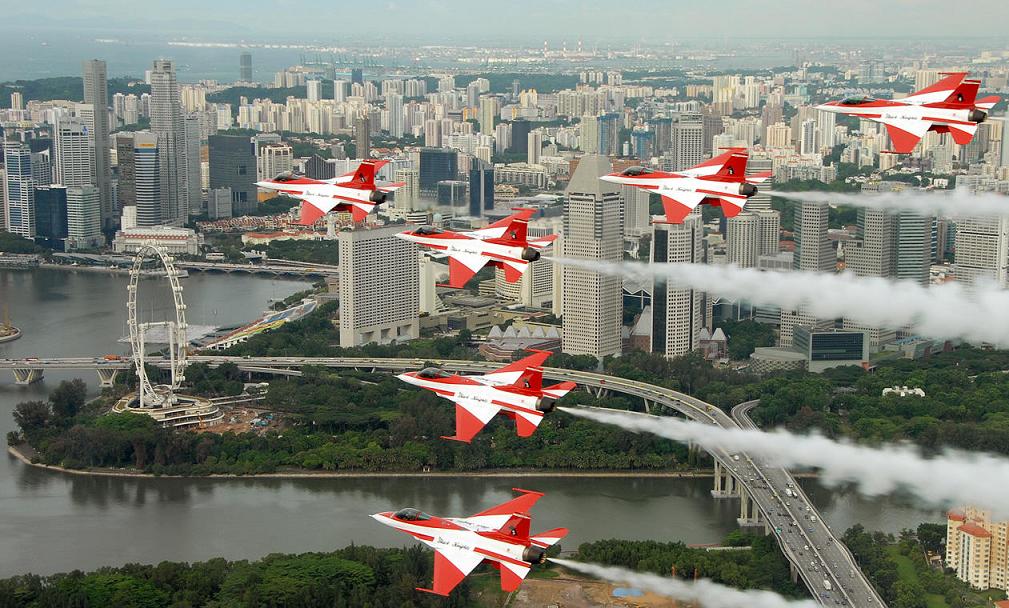
    -Lastly, paint a RSAF blackknight scheme on it!

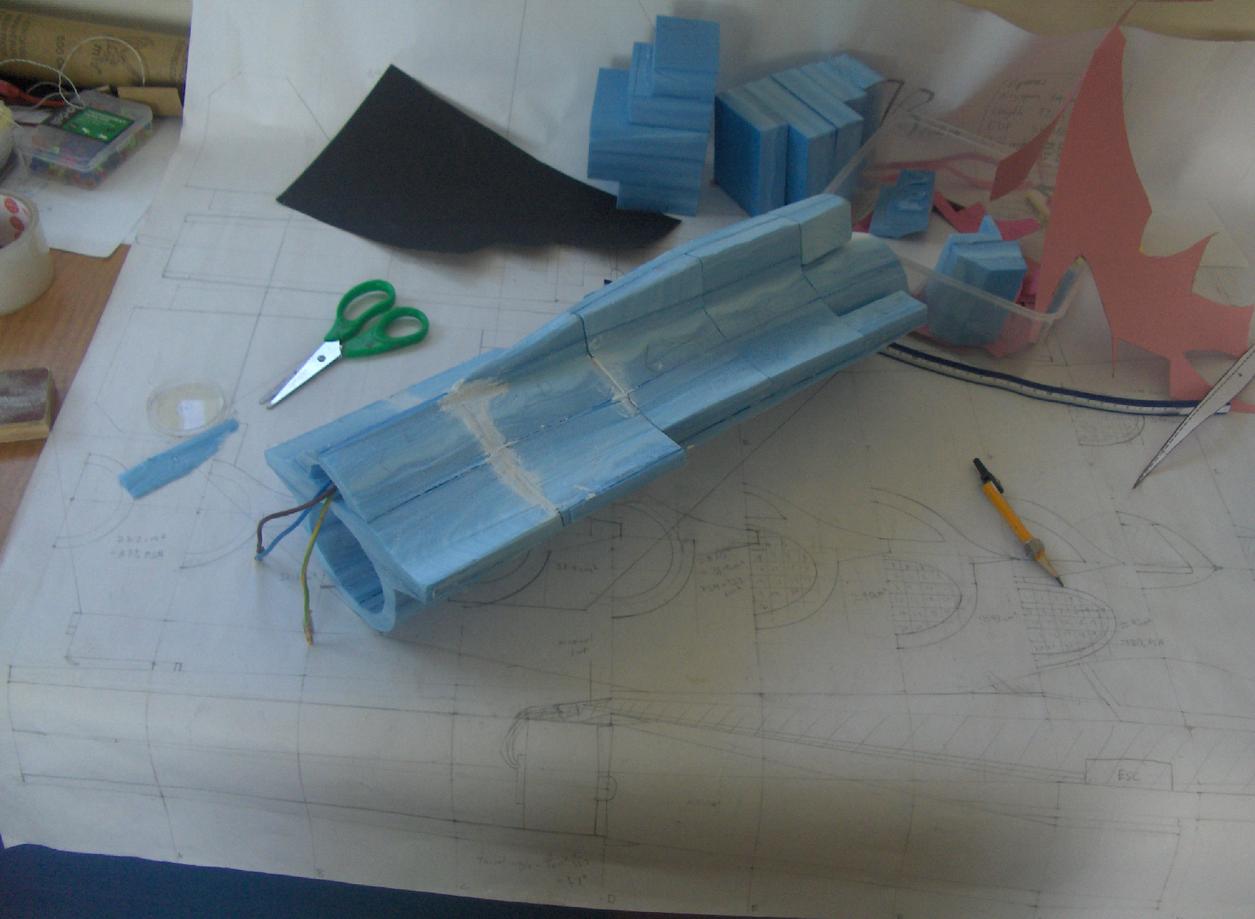
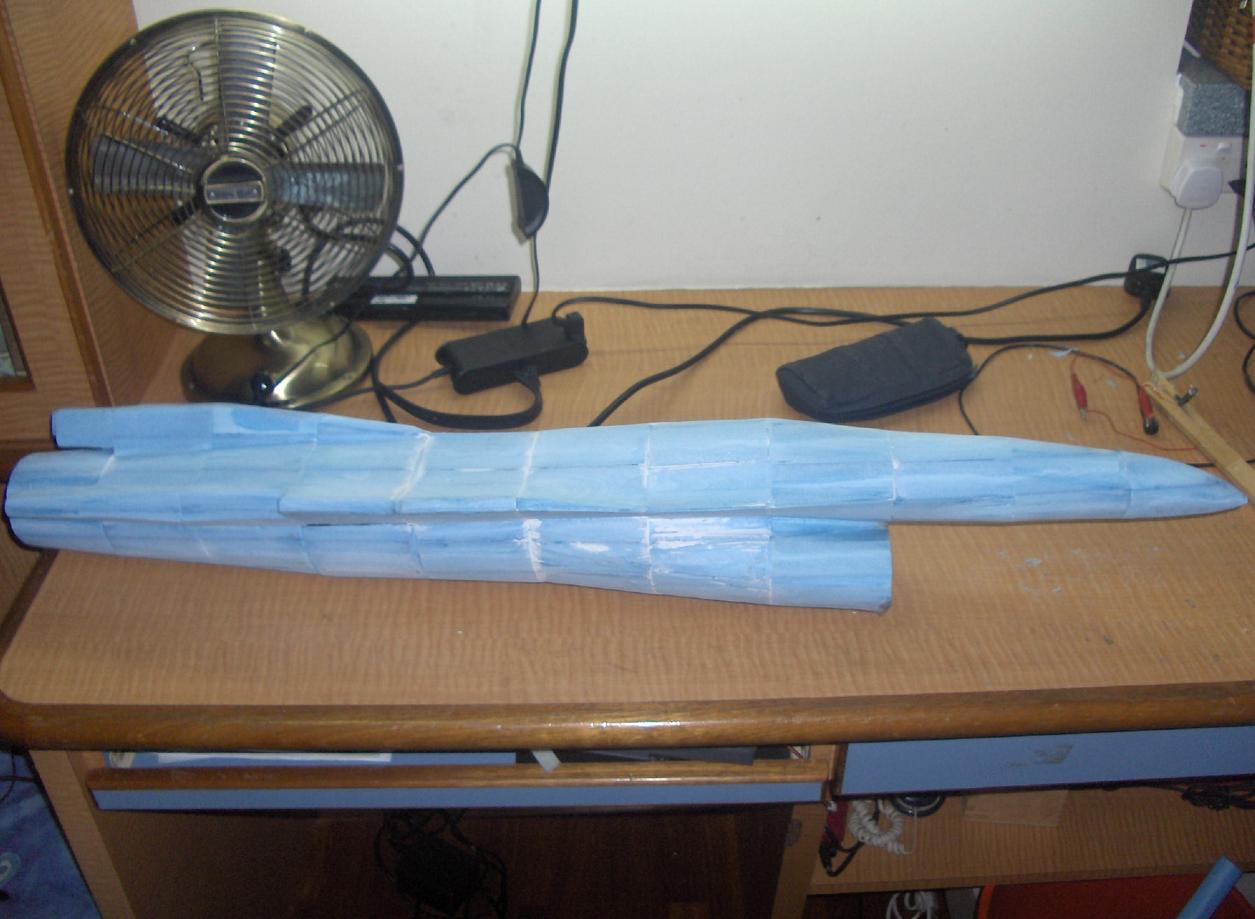
    Firstly, I start off by finding f-16 plans on the web...which i'm unable to do so. Even though parkjets has 4 F-16 plans , They require hot water foam bending which requires 6mm depron. (i have no experience in that) Futhermore i'm using blue foam for this build.

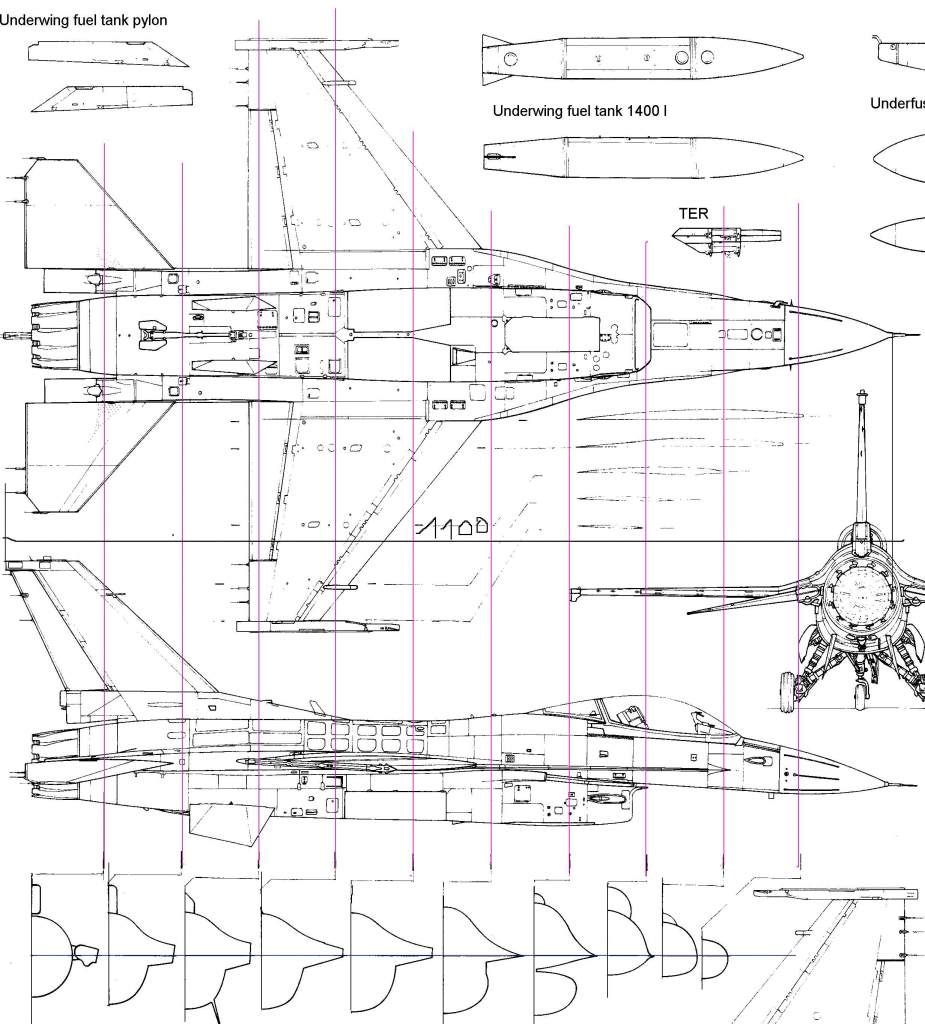
    I Downloaded a 3 plan-view from the net... which is supposingly the REAL f-16 build plan. The plan came out pretty small from my printer so i had to rescale it up 5times by drawing on a piece of majong paper. Which probably took me 5days i draw...tons of calculation especially calculating each cross-sectional area of the EDF with decreasing area from intake to exhuast. Big headache.

    I use the rule of thumb 120% FSA for intake and 90%FSA for exhuast.

    Build it
    Fly it
    Crash it
    Fix it

    #2
    Very nice, May I know how do you calculate the 120% intake and 90% outlet FSA? How far can we recduce the outlet to on a 68mm?

    Comment


      #3
      Originally posted by Alvin Roger View Post
      Very nice, May I know how do you calculate the 120% intake and 90% outlet FSA? How far can we recduce the outlet to on a 68mm?
      researched have shown that you can accelerate air to its maximum potential at 80% FSA any smaller it'll have reverse effect and efficiency decreases. Same goes to inlet..., too big means more draggy , too small, you'll starve the EDF to death! It won't breath..haha
      Build it
      Fly it
      Crash it
      Fix it

      Comment


        #4
        Snice i'm using hotwiring meathods to do my cutting. I will need templates for guiding the hotwire for complex shapes.

        My templates are simple vanguard sheet (30cents only) bought from a local bookstore or popular. All the templates fit nicely into one piece of vanguard with space to spare. Cut it all out and ready for some hotwiring!

        I use pins to pin down the templates on the blue foam so that it dosen't move about which might cause ugly finishing.

        1 part took approx 20-30mins to cut, together i have 24 pieces (Just the fuselage) , so you do the maths! , I had a longggg day hotwiring bluefoam.

        All 24 templates are cut out and joined together piece by piece. Joining them accurately is crucial because i've to keep the ducting as smooth as possible. Any uneven surfaces i'll just sand to level them.

        Build it
        Fly it
        Crash it
        Fix it

        Comment


          #5
          Takes another few hours to do the joining! I use hot glue to join the pieces together..., Though the proper way is using UHU por or CA glue. The reason i use hot glue is that the glue hardens really really quick..about 1minute and solid bonding. Disadvantage is ,it might get messy... and it burns the foam if apply too much.

          The hardest part of the build is getting the ducting intake shape correctly. The 'curves' and the seperation point from the fuselage must be nice and neat. (circled in red in the picture)

          As you can see the finish product is rough...and full of machine lines...in this case, hotwiring lines. Burned marks and uneven surfaces. Simply just use a sandpaper and level the 2 surfaces together. I took anther 2 hours to sand the whole plane!

          And finally , the plane looks much nicer and and cleaner after the sanding.

          Build it
          Fly it
          Crash it
          Fix it

          Comment


            #6
            After the fuselage is done, On with the wings!

            I didn't select any airfoils online.., instead i draw one myself. 5% thickness at 40% chord with slight camber. Airfoil at the wing tip is twice as thin but thick enough for my 3mm carbon rod is fit in.

            I started with normal white foam for the wing because its light and easy to cut, but i threw them away because the wing is so fragile, even with the CF rod inside. I move on with the blue foam wings instead...strong and steady even its 5mm thick.

            Elevators too is airfoiled, also my home-made airfoil, 5%thickness 50% chord with symmectrical airfoil. Snice i studied elevators airfoiled provide much better flight performace.

            The cutting is the same way i made the fuselage, place the airfoil template and hotwire it into shape.

            Total,it took me 4hours to cut and sand.

            Build it
            Fly it
            Crash it
            Fix it

            Comment


              #7
              Originally posted by viper1990 View Post
              researched have shown that you can accelerate air to its maximum potential at 80% FSA any smaller it'll have reverse effect and efficiency decreases. Same goes to inlet..., too big means more draggy , too small, you'll starve the EDF to death! It won't breath..haha
              Thanks for you advice, I would like to find out how to measure the percentage of the FSA on your model? How you came out with the figures of 120% FSA on intakes?

              Comment


                #8
                Originally posted by Alvin Roger View Post
                Thanks for you advice, I would like to find out how to measure the percentage of the FSA on your model? How you came out with the figures of 120% FSA on intakes?
                I don't really know the maths or how it come about to 120% FSA , but thats the standered rule of thumb people tested over the years and came out with that figure.

                Things to note though is..., collapsing of duct intake. Imagine you putting your hands and cover the vaccum cleaner intake partially or completly. you'll probably realise the tube shrunk. Same goes to edf intake , if too small it might collaspe ( though i never seen my edf intake collasping before i wish i don't see it happen )

                Exhuast is different, the pressurized air keeps the duct expanded.

                I got this qoute from the internet
                "You will get better answers if you ask this in the EDF forum. Ductwork is based on FSA (Fan Sweep Area). This is the area of the inside diameter of the fan housing minus the area of the fan hub. General rule of thumb= intake area 110-120% of FSA. Outlet area 80-100% FSA. Smaller outlet = higher exit velocity, larger outlet = more static thust."

                More info for EDF...my favourite website , though is wordy and lenghtly with no pictures, its worth the reading!

                Build it
                Fly it
                Crash it
                Fix it

                Comment


                  #9
                  Another important step is joining the wings to the fuselage, Snice the wing is 2 piece instead of 1 piece , Without proper joining meathods ,Very likly during the joining process, the wings might have different angle of attack or dihedral. For my meathod, i have the fuselage place on a flat surface and 2 blocks of foam holding the fuselage in place while using a ruler to check the straightness of the plane with reference to my table.

                  Then i place another block of foam under the wing to match the height of the part where the wing meets the fuselage. That would give me 0 degree dihedral.

                  Sand the wings to level off with the fuselage. Oh by the way the white colour stuffs on my plane is wood putty filler, pretty useful for filling in gaps! When it hardens and sanded, the surface is very smooth.

                  The rest of the building process is pretty simple. Its like joining parts that came out from a kit! Add in the full moving elevons and the servos that controls them. Join the vertical stabilizer. All done in 2hours.

                  Build it
                  Fly it
                  Crash it
                  Fix it

                  Comment


                    #10
                    With all parts now in place. Time to do the cockpit. I bought the 100plus bottle drink from any drinkstore or supermarket, cheap cheap canopy only $1.50! Of course the drink didn't go to waste.., i drank 100plus while building the plane.

                    i hotwired the head of the plane to creat space for the lipo, rx and esc. The wire from the edf to esc runs internally inside the plane.

                    Just like my f-22 canopy, i place a mini HUD and a chair inside to make it look realistic.

                    Nothing much to describe about the construction of the canopy.., just a little creativity here and there ,glue the cut-out plastic parts with hotglue and its done easily!

                    The canopy is joined with velcro on the fuselage, ( the 2 small little patch in the picture is the velcro). After adding the rx and esc, the canopy is still pretty spacious! Probably it can fit up to 3s 5000mah sized battery!

                    Build it
                    Fly it
                    Crash it
                    Fix it

                    Comment


                      #11
                      The plane is pretty much done now. Ealier in my steps of building, i realise that the intake duct wasn't sanded properly as it has rough surfaces. I've to cut open the ducting and sand the interior all over again and finish off with a super fine sandpaper , the ducting surface now feels like a really smooth tabletop.

                      The black strip thing you see at the front of the intake...well, its a carbon strip glued into place. Its to absorb the impact during landing so that the ducting dosen't get crushed during landing (i hope!) As i belive that those who fly f-16 usally got their ducting teared apart during hard landings

                      ok, so far this is what i done till today. Now a bare blue F-16 ready to be painted Blackknights no.6 (er...my favourite number) and get it up up into the air!

                      Build it
                      Fly it
                      Crash it
                      Fix it

                      Comment


                        #12
                        wowwwwwwwwwww, nice work viper
                        when do you intend to fly this f16, i love to see this
                        just fly high think later

                        -roy

                        Comment


                          #13
                          I already madiened the plane today at singapore poly field. I was afraid that i couldn't fly within the small field. My friends persuaded me to madien my plane asap before the sunset... and it did flew the first launch. With full throttle and a strong throw it climbs pretty well. And this is my first edf that could glide when i cut the throttle ..probably thanks to the clean airfoil and fuselage.

                          By the way the plane is now half-painted ,yes i know its not a pretty sight. as there are patches all over it..., the white colour is actually not achieved by painting white..but by applying a "tissue" kind of material from art friend mixed with whiteglue it forms a verysmooth layer,feels like hard plastic, but its light! . I'll get the painting done by tomorrow and blackknights decals paste on it.

                          Build it
                          Fly it
                          Crash it
                          Fix it

                          Comment


                            #14
                            Well done Viper1990. You have really come a very long way since your very first scratch build. The improvement is there for everybody to see. From your build planning, technique all the way down to your finish.

                            Congratulations on your maiden and hope you'll have many more fruitful flights with this plane. I'll also be looking forward to more of your scratch builds in the future.

                            Cheers,
                            Adnan
                            Take what you've got and fly with it - Jim Henson
                            ... no plane will allow a pilot to recover from stupid. You still have to do those piloty things... - Joe Wurts
                            Electric things run on smoke. Let the smoke out and they won't work.


                            sigpic

                            Comment


                              #15
                              Good job, Viper. Now you have master the knowledge of aerodynamics and airframe structures, your next move is to work on improving the finishing. Learn from your mistakes and experiences and think of how to improve yuor skills and techniques.

                              Comment

                              Working...
                              X