Announcement

Collapse
No announcement yet.

Slow Flying Concorde

Collapse

Zenm Tech Pte Ltd

Collapse

Visit Zenmtech at rc.zenmtech.com

X
 
  • Filter
  • Time
  • Show
Clear All
new posts

    #76
    Umm me been a thinking.... we all know the CoG is very important for our models to fly so I wanted to validate the CoG of the Concorde. One has to extraoplate the leading edge of the delta until it meets the center line which just happens to be where the nose block joins, so the planned CoG is 375 mm + 111 mm (486 mm) from this point.

    If we pump the numbers into a Java program that I have we get the CoG 328 mm from the delta's point. That is quite a difference so the chuck glider is a must to validate which one is correct....

    If the program is nearer then that may explain why the SIM version did crazy things, so I will try loading these values into that model as well and see what happens.

    Comment


      #77
      Just a thought , if any of you guys want the Java scripts please drop me a PM, they also cover converntional aircrafts and canards.

      Comment


        #78
        Sorry to say not much happening in SSW on the Concorde, work, work is keeping me busy before I go on vacation to Dubai and the UK. AstroBoy has provided me with a special set of drawings to make the "Chuckie glider Concorde" to validate the CG location so I shall be cutting Depron and hopefully getting this airbourne in the lounge

        The attached picture shows the decal set for the Concorde which is winging its way accross the Pacific to Singapore, so on return from vacation we should complete the Concorde ready for the "maiden fright"

        Comment


          #79
          You will note in the above picture there appears to be more than 1 set of decals, you are correct there are actually 2 sets to allow for my blunders although I only pay for one set. The company has also done 3 renderings of the cockpit windows, again this is so I can choose the best match for the model when it is finished.

          Although the model has quite a small wingspan it is actually 1.24 meters long +/- a few mm.

          Comment


            #80
            Back at post # 73 I mentioned the test using the "paste" or watered down white glue and tissue on the test piece and I had a weight gain of 35%. What went wrong I do not know but I had that buzz that something was wrong with experiment.

            This time I reversed the ratio 60% water and 40% white glue with a dash of food colouring and it is a dash just one drop is all that is needed. So I made another test piece with odd ball angles and tried again. I discovered that one side of the Depron we purchase from Art Friend seems to have an oily film on it, a quick rub 220 grit and that disappeared. For the test the double angled corner was sanded to 150 grit, which is usually just plain lousy if you spray it. The other new ingrediant I used was a box of extra light weight tissue paper from the LHS, which compared to brown paper is like a brick to balsa as far as weight goes.

            This time Eureka only a 10% increase in weight, and the piece can be sanded just like before. I believe the first failure was not removing the excess glue that comes through the tissue paper, a bit like a paper kitchen towel

            So I shall try one more time but this time using the MOHA plant sprayer, it might be a night mare to clean up but the spray it was only S$ 10, good job I am going away .....

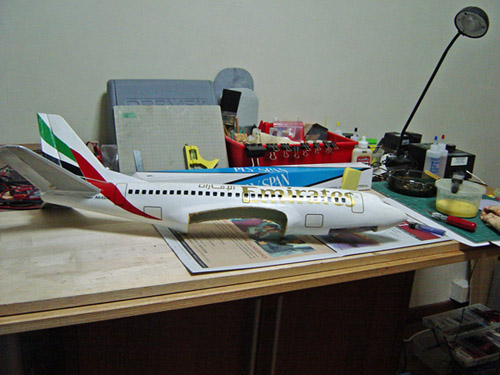
            So why did I try again apart from that feeling that something was wrong, very simple actually the picture of the B737-500 fuselage is made from blue foam covered with brown paper and a 80% glue 20% water mix and the weight increase was only 20% (I must get around to finishing this), both much heavier than tissue and the mix I have just used.

            Comment


              #81
              I also noticed that Ryan in post # 8 of the "cheap foam paint" thread also uses this method, and of course his comments about the additional durability the tissue and glue gives the foam. Going to be pretty essential for Concorde when she returns to mother earth under the will of Mr Gravity.

              If the results are anything like the B737 fuselage the amount of paint required is a real "splash and dash" job compared the cans of spray that I used on the F-15.

              Comment


                #82
                Originally posted by DennisP

                The same Dremel tool that was used to slot the tail cone for the fin is again used but with two different bits, a ball head for the fiber tubes and a straight router bit for the cable grooves. If you decide to follow this technique do make sure that you set the depth right , "been there done it" a perfect slot not with Concorde wing..

                Here is the first photo showing the leading edge slot being cut, and at the end of slot.
                Is that the Dremel slot cutter attachement?
                been wanting to get that for a while and have not seen a reason to until now...hehehe....

                Comment


                  #83
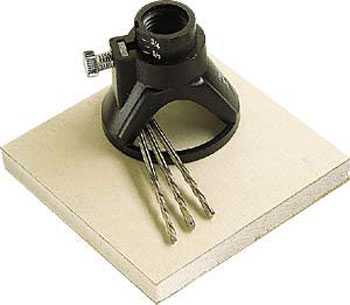
                  The tool I used is called "Dremel Multi Purpose Cutting kit" US$ 17.99 from Tower Hobbies in the USA. I tried at all the Dremel stockists I could find in Singapore and could not obtain same. I believe the Dremel part number is 0565, Tower Hobbies part number is LXYA59. Here is a picture of the tool.

                  Comment


                    #84
                    Having bitten the bullet and decided to tissue cover the Concorde, work began Friday night and finished today Saturday afternoon. Those lovely curves are great until you come to tissue the beast. In view of the previous experiment not working I decided to keep a close eye on things and Yes experiment further.

                    Starting with the bottom first as this is the hardest part with so many complex curves and a 40 - 60 mix with yellow food colouring I moved along. I initially used Elmers wood glue from HomeFix but although this is good for balsa and ply it is quite thick so I soon gave up and moved to Great Planes Alphatic glue. Same amount of stick but more fluid, still keeping the 60 - 40 mix.

                    I had forgotton how difficult is it to tissue cover sheet surfaces as there is no give once you have laid it on the surface, I used the same technique as when you use covering film, tack the corners and keep the film tight. This was reasonably successful but I still managed a few wrinkles here and there. The good news is when the glue has dried hard you can sand these away leaving a nice smooth surface.

                    Needless to say things do go wrong and they did , I had forgotten about the oily surface of an unsanded piece of Depron and that vertical stabilser is just that. , quickly solved by removing the tissue and glue and a quick sand with 400 grit and we were back in business again.

                    As a word of advice it is better to use small pieces of tissue than one large piece, things are more managable and the tissue is so thin the joint will not show after sanding.

                    Now it is wait until tomorrow so the glue is really hard and then fine sand down ready for the painting. As I have the tissue glue base there should not be a need for primer so that is a weight saving, so two light coats of white Acrylic spray should see the job done.

                    So what was the impact of using this technique on the model, well as I am sure that you interested here are the figures.

                    Raw Depron airframe: 328 grams
                    Belly unsanded: 354 grams, +7.9%
                    Total unsanded: 384 grams, + 17%

                    The belly was done using Elmers wood glue and has a lot less area than the top (fuselage top,sides and fin), so using Great Planes Alphatic for the entire task would have resulted in a lower weight gain. So I now know what to use the next time.

                    So now we have a banana coloured Concorde , there was a Pepsi coloured one but never a banana one! Still this is a similar colour to the anti corrosive paint used by real plane makers and that is my excuse and I am sticking to it. The use of tissue has considerably reduced the hanger rash problems we all experience at some point in time, the nose survived with no damage as yours truly dropped the model off the bench.

                    Some of you will notice lines on the fuselage balsa, these are marks under the tissue to indicate where the fuselage formers are, I shall make up a cardboard template so that this can be used when the hatch is cut.

                    So here is the Banana Concorde...

                    Comment


                      #85
                      Originally posted by DennisP
                      The tool I used is called "Dremel Multi Purpose Cutting kit" US$ 17.99 from Tower Hobbies in the USA. I tried at all the Dremel stockists I could find in Singapore and could not obtain same. I believe the Dremel part number is 0565, Tower Hobbies part number is LXYA59. Here is a picture of the tool.
                      Thanks for the information bro...
                      I will see if i can find it .. the sole distributor for dremel in singapore is Robert bosche ( yes the spark plug and hardware drill company)

                      thanks~! again!

                      Comment


                        #86
                        NICE!

                        The weight looks good too!

                        Comment


                          #87
                          As MOHA was going out to get a present for my grand daughter in the UK I quickly converted the washing area into a spray booth. So the fun began, a quick flash of matt white followed by a gloss white final colour, followed by the inevitable clean up of the mess that I had made before the MOHA returned.

                          If there is one thing that I have learnt about spraying and that is it shows every imperfection you possibly could find on the painted surface and Concorde was not exception. What looked like tiny marks where I had sanded the tisssue creases now look like the Grand Canyon. Now I really must go on a training course on paint spraying any ideas guys..? I also have some ideas on how to avoid those tissue wrinkles so I will test this out on the TSR2.

                          Still fortune was on my side as the decals did not arrive from the USA, must be on a Vickers Vimey the time it is taking. I wish the end results were better, although they are major leap over the F-15, but I still have not achieved the results I really wanted to achieve.

                          As I am off on vacation for two weeks (thanks goodness you are all saying ) the paint will have time to really harden so I will try a rub down with wet and dry 1000 grit to improve the finish (I hope).

                          So what was the impact of the paint..?

                          Well here are the figures:

                          Base weight: 328 grammes
                          Ready for spraying: 384 grammes (tissue and glue covered), + 17%
                          Sprayed: 450 grammes, 37%

                          So we all know who the big enemy is....

                          The model has turned out slightly heavier than I anticipated and as I have mentioned before 33% is the usual increase when painted.

                          Now doing all this and telling you guys of my successes and failures is good as will help me next time and hopefully help you as well. Lessons learnt this time, the matt finish was good and the gloss was a luxuary so I pay the penalty for the luxuary. So I would expect with just one coat of the matt white I would have reduced the 122 grammes increase to half that which would have met my target of less than 30% or to be precise 27%. The important things is to learn from your misstakes.

                          So AstroBoy the TSR2 will get one coat as that wing is so small it will stall at Mach 3.

                          The picture shows the Concorde back in her correct colours (banana yellow just was not her ).

                          However I do recommend another DH follower having a go at the Concorde as it a great model to build with all those lovely curves. I have also included the Build list so far and it is quite light on the model money box (the numbers are in US$).

                          Now I must clear up area 617 of the SSW and then start packing my kit for the vacation. All being well the decals will be here on my return and of course that outher 10 lb weight box from Tower Hobbies. who likes living on the edge.........

                          The other piece of good news is of course I read the DH in Dubai and the UK and see what you guys are doing... Have fun and Safe Flying.....

                          Comment


                            #88
                            nice!!!!


                            From the pic, the finishing surface looks awesome!

                            Comment


                              #89
                              Thanks KennyC, still have a way to go.....

                              Comment


                                #90
                                Originally posted by DennisP
                                So AstroBoy the TSR2 will get one coat as that wing is so small it will stall at Mach 3.
                                Dennis, your concorde looks BEAUTIFUL!!!

                                And your TSR-2 drawings are ready for your next foam build project, as requested

                                Comment

                                Working...
                                X