Announcement

Collapse
No announcement yet.

F16-Guanli built

Collapse

Zenm Tech Pte Ltd

Collapse

Visit Zenmtech at rc.zenmtech.com

X
 
  • Filter
  • Time
  • Show
Clear All
new posts

    F16-Guanli built

    The F16 kit looks great but there are some areas needed modification:-
    The Kit recommend 1500mAH 3S lipo and a single servo using snake linkage . This will have to go or modified.
    The steering nose horn is purely plastic(no metal re-enforce)...just too weak. Will be replace with a better ones


    My comment:-
    1)If you follow the battery size /capacity , the flight will be short so is the lifespan of the batteries.

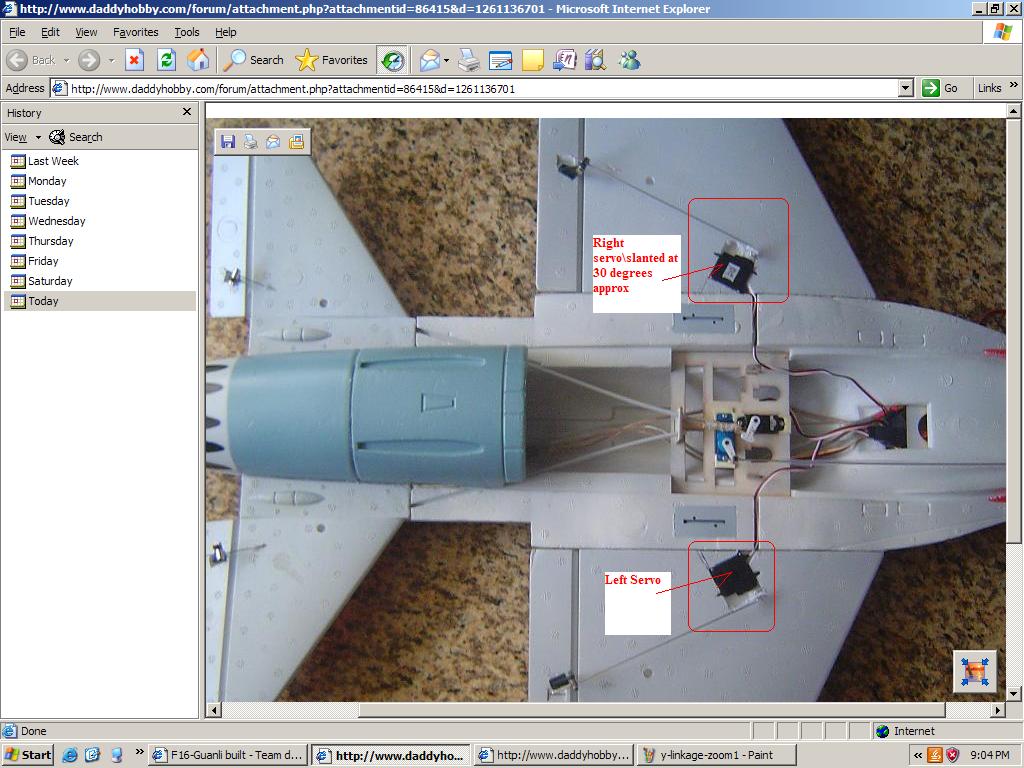
    2) I feel the single micro servo will be unduly stress by the snake type linkage so i opt to use 2 servos for the aileron controls.

    3) Steering nose horn is replaced with a stronger and better ones.

    The first thing to do is to get rid of the original location of the nose gear. Relocating the gear towards the nose vertex .
    This modification make lots of room for a bigger size lipo battery and allows better protection to the nose during landing and take off. Am thinking at least a 2200mah 3S 25C or a better 3800maH 3s 25C or even 4S setup .

    4) I opted to use a proven 70mm EDF setup rather than to re-test the stock fan. (got to save time testing the stock fan. Better use the time for building instead). I need to remove some foam so this particular 70mm could fit in.

    more next time.


    #2
    Assembly F16 cont.....

    1) I use a 5mm diameter bamboo dowel to provide the Y linkage for the elevator.
    2) I installed the world model 70mm EDF unit. I removed some foam inside the fuselage and replaced the two supporting 3mm ply wood mount.
    3) I reposition the nose control horn outside the nose landing gear . The servo for controlling the nose gear is located inside the fuselage.(one of the unused servo slot )

    Comment


      #3
      F16 built cont-final phase.

      1.) glue in the nose cone and vertical fin and drop tank.
      2.) Plane is RTF.
      3.) C.G is nose heavy with the Rhino 2250maH 3S lipo , so ballast weight required at the tail end.

      Tested the steering and EDF . Runs great plenty of thrust.

      Should be ready for maiden this weekend depends on the weather .


      By the way anyone who has flown this Guanli F16 Kit , may I ask how much throw is required for the Elevator and the aileron?

      Thanks for viewing.


      Comment


        #4
        F16 maiden sucessfully!

        Today morning was good and sunny so I decided to take out the f16 to maiden.

        I opted for hand launch instead of ROG because it was quite windy and crosswind and the runway was not wide enough.
        The plane took off , requiring very little toss . A little trim out was necessary to get the F16 on track. The C.G. was spot on as indicated on the manual. This model required 35g of ballast at the tail to get the c.g . on spot with a 2250maH 3 S packs.
        Rolls were nice and crispy and loops is generous thanks to the good thrust generated by the world model EDF. The plane glide very well when the motor shuts off completely.
        I am pretty satisfied that this is a good kit except the following negative comment:-

        1) the poor layout and construction of the nose gear
        2) The snaking method use for the aileron controls with a single micro servos.
        3) The recommended 1500mAH 3S lipo is just not correct which may lead to the lipo early demised. (This EDF unit easily suck 40-42amps at full charge LIPO battery).

        More next time when pictures and video of the maiden is available.


        Cheers

        Comment


          #5
          Some pictures taken during the maiden flight....
          Thanks for viewing.

          Cheers

          Comment


            #6
            F16 maiden video

            Hi, here is the video
            take off


            ....landing
            F16 EDF Guanli model with 70mm EDF on 3 S lipo making a landing during the maiden.Planes glide very well.


            That's about the concluding series of the F16 built thread from building to flying.

            Cheers and thank you for viewing

            Comment


              #7
              Congrats on your maiden!
              Stop looking for a gyro in my plane, they are all in the head.

              Comment


                #8
                Thank you Edmond.
                Here are some pictures taken during the flying yeaterday by Vincent.

                Comment


                  #9
                  more video of the F16 with the landing gear removed
                  Launch...


                  Landing


                  Thank you for viewing

                  Comment


                    #10
                    F16 Guan Li built advisory.

                    This Kit has two severe flaw in the design which may result in servo failure or
                    Elevator Jammed .

                    1) The recommended single servo with the snake linkage for the aileron controls may result in some micro servo failure. Use Two servos setup or a single strong servo with high torque for aileron controls.

                    2) The location of the elevator servo is too close to the "Y" linkage which may result or hinder servo movement ...worst case servo jammed.

                    My solution

                    1) I use two servos for the aileron.

                    2) I reposition the elevator to the location where the single aileron servo should be. I use 5mm round dowel(your houshold disposable bamboo chopstick )to make the Y linkage. This dowel also extend the length of the existing snake cable so that it can link with the newly positioned elevator servos. Most important it does not jammed or stress the servo to failure.

                    There are other methods you can try but this is by far very workable solution.

                    Other warning: The Elevator hinges is very weak so I use surgical tape over the existing hinges.

                    Cheers and hope your successful flight with this kit.

                    Comment


                      #11
                      Good modification!

                      I also believe in having separate servos ( especially if you are using cheap 9 grams ). But do take care of servo overloading with using too much individual servos.. 4 is probably max. Else we need UBEC.

                      As for the reducing servo stress, the plastic tubing should be trimmed shorter ( near the servo side ends ) so that the force on the linkage used to push or pull the control surface does not push the plastic tubing outward / sideways when the Y-linkage travels near the pair of tubing opening.
                      I'm Remotely Controlled ...

                      Comment


                        #12
                        Hi Blue Angel, thank you for your feedback. I am building another F16 (not a Guanli kit), the Y mechanical linkage will use for the elevator as well.

                        I will normally study the kit and note any potential flaw in the design or weaknesses and remedy before proceeding.

                        I usually follow some basic rule:-

                        1) Note the battery compartment must be large enough room to take sufficient size batteries or allow the battery to be shifted to get the correct c.g. If not, make room.

                        2) Calculate the wing loading usually below 15oz per sq foot (This will give the indication the limited weight you can put into the plane. 15 Oz per sq foot is not fix but is my preference for easy take off and landing.

                        3) Check if one or two servos is sufficient to do the job ...like you have mentioned those micro servos.

                        4) Note any inherent structural weakness especially the wing and elevator section. If necessary add carbon spar for support or make modification to remedy the weakness.

                        5) Any recommendation from the manual must be taken with a pinch of salt. Don't follow blindly. E.G . C.G. location. Some manual stated wrong C.G. location or did not mention any at all. Check the internet for the correct c.g.
                        of the model under construction.

                        Cheers

                        Comment


                          #13
                          Hi Babylon5,

                          I just bought the same kit and I was just curious about the how much throw is required for the Elevator and the aileron?
                          And did you use that chopcow contact glue that's in the kit? I prefur epoxi glue to glue this plane.

                          I am gonna use youre mods on this kit also, all of this seem also logical to me.

                          Grtz,
                          Heino

                          Comment


                            #14
                            I hope my memory serves me well, I use approximately 6-7mm up/ down for the Aileron with about 30% exponent and if you want more acrobatic gradually increase the throw. Elevator about 8-10mm up /down and zero exponent.

                            I use silicon glue from Art Select. I don't trust those China made glue. Bad experience before. Silicon glue binds better than epoxy for foam material but takes longer time to cure.

                            Got the glue at 1 buck from some post office or around $1.25 at popular book store. The Glue takes an hour to set. Also don't put the foam member together immediately after applying glue. Let the glue dry about 30-45 seconds before putting the foam member together.

                            Epoxy glue is OK except it is heavy and you need to sand those foam covered by paint or poke needle holes into the foam for the epoxy to seep into the pore.


                            The F16 require quite a few ballast weight at the rear end because I use a heavy 2250mah 3s Lipo to get the c.g right.
                            My EDF sucks 42-44 amps so it required a good Lithium polymer battery like Rhino 25 c battery. Other weaker ( not so good) 2250mah 3S 25 C won't survive over 10 flight before they exhibit significant lost of power.

                            Hope this will help.

                            Cheers

                            Comment


                              #15
                              Hi Babylon5,

                              Thanks for youre quick reply, I will scramble all the stuff that is needed for this kit and start assemble it.

                              About the silicon glue, well that's a new one for me but I've seen the stuff before so I will have a go with that.

                              Many thanks,
                              Heino

                              Comment

                              Working...
                              X