Announcement

Collapse
No announcement yet.

Binary900 DLG Build thread

Collapse

Zenm Tech Pte Ltd

Collapse

Visit Zenmtech at rc.zenmtech.com

X
 
  • Filter
  • Time
  • Show
Clear All
new posts

    Binary900 DLG Build thread


    The slope season seemed rather short this year and I can't seem to have enough of gliders this season. The thought of flying without motors and the general cost of lipos makes gliding such an attractive option. Thus my decision to take up the challenge of DLG. And the Binary 900 (B900) seemed like a nice small DLG to start off with.

    The Binary 900 is a simple rudder-elevator glider. Rudder-elevator only planes seem to have a stigma of being boring, but I prefer taking baby steps when venturing into unknown territory, and the less i spend on it the better at sustaining the interest/fun.

    Ok enough jabbering, and let's start building.


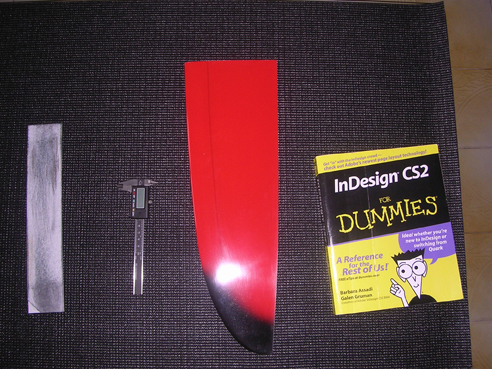
    (The "tools" for the job: from left to right: sanding block, digital vernier calipers(damn cool to have), the wing, and the dummies guide to A"dope" InDesign (FreeHand Rules!!!))

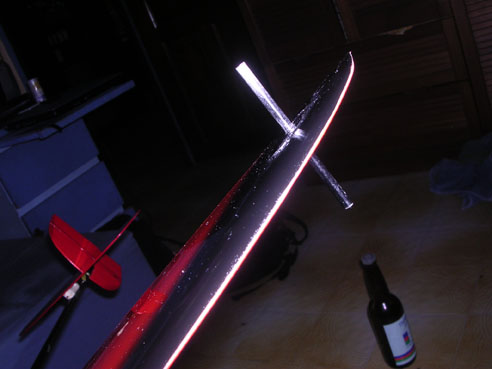
    First part of the whole build is to sand one of the wing roots to get the proper dihedral angle.

    This is done by propping the wingtip 64mm off the work bench and sanding the wing root flushed to the edge of the bench.


    I just needed a few runs of the sanding block to get the angle right. and the first part of the build is done.

    Take what you've got and fly with it - Jim Henson
    ... no plane will allow a pilot to recover from stupid. You still have to do those piloty things... - Joe Wurts
    Electric things run on smoke. Let the smoke out and they won't work.


    sigpic

    #2
    Now it's time to put the wings together. For this part of the build I used 20 minutes epoxy and microballoons mix to join the wings together. Also not forgetting kitchen towels and some alchohol to clean up the excess grub and mess i may leave anywhere else.


    As per instructions, I taped the bottom of the two wings together. Then i taped one wing half to the work bench and propped the other wing half up so that the wing tip is 128mm of the work bench.

    To facilitate this, I marked out the ruler to 128mm and stuck it to a box. Let's me work with both my hands to clean up whatever mess I'll make along the way.


    Got the dihedral angle right, pour the epoxy/microballoons mix in the gap in between the wings and clean up whatever excess grub with the kitchen towels. Taping the wings help in not making a bigger mess which i know i am totally capable of.


    Keeping it clean generally keeps any weight gain to the minimum.


    (the completed wing)
    Take what you've got and fly with it - Jim Henson
    ... no plane will allow a pilot to recover from stupid. You still have to do those piloty things... - Joe Wurts
    Electric things run on smoke. Let the smoke out and they won't work.


    sigpic

    Comment


      #3
      Wow nice. Looking forward to ur rest of ur build and videos of it flying.

      Cheers!
      Spektrum DX7
      sigpic

      Comment


        #4
        Thanks Louis for the kind words...

        Ok on with the build. Next up is drilling the holes in the wings for the mounting screws hard points. First up, I taped the general area with painters tape where the hole is going to be drilled and marked them with a marker. Followed the measurements as per instructions. Two holes in front, one behind. After marking them out, I made a pilot hole with my reamer to assist me when I drill the holes out.


        (Making pilot holes before actual drilling)


        (Holey red wings batman!)

        Now is time to glue the hard points into the holes. For this step i used lengths of blue tape to cover up the wings and the aluminium wings saddles. I also taped down the wing saddle to the boom so that it won't move around so much. I then greased the screws so that the epoxy/microballoons slurry won't bind to them and mounted them on the wing saddles. Next, I mixed me some slurry and slathered it all over the hard points before mounting the wings onto the hard points.


        As i wait for the slurry to harden, I made sure the wings are mounted equally. I did this by first taping down a string to the centre of the end of the tail boom. Then I made sure that both wings were of equidistance to the tail.


        (Making sure both wing tips are of equal distance to the tail with a mark on a string taped to the end of the boom)


        (tape everything down in place as the slurry sets and hardens.
        Take what you've got and fly with it - Jim Henson
        ... no plane will allow a pilot to recover from stupid. You still have to do those piloty things... - Joe Wurts
        Electric things run on smoke. Let the smoke out and they won't work.


        sigpic

        Comment


          #5
          Once the hard points were set and the epoxy-balloons mix hardened, I removed the wings from the wing saddles. I then grinded down the excess hard points potruding from the wing to flush it level.


          Once that's done I cleaned the area around the hard points with denatured alchohol to prepare it for the fibreglass cloth reinforcement.

          To do this i cut the provided FG cloth to the desired length and sprayed it with a very light coat of 3M 77. I didn't spray too much as I just needed the FG cloth to just be slightly tacky to the touch and i didn't want to add too much weight with all the excess glue. I did the fore hard points first. As usual I had painters tape around the work area to keep the mess to a minimum. I then slathered the FG cloth with 20 minute epoxy, removing excess epoxy with a kitchen towel. After that I place a piece of plastic over the FG cloth and clamped it down.


          I then proceeded to do the same for the length of the wing root.

          Take what you've got and fly with it - Jim Henson
          ... no plane will allow a pilot to recover from stupid. You still have to do those piloty things... - Joe Wurts
          Electric things run on smoke. Let the smoke out and they won't work.


          sigpic

          Comment


            #6
            Ooh, so pretty.

            DLGs are great, they get to a decent height without the hassle of a high-start.
            "Always fly with a responsible attitude. You may think that flying low over other people’s heads is proof of your piloting skill; others know better. The real expert does not need to prove himself in such childish ways..." - the Multiplex Build Manual

            Comment


              #7
              Originally posted by Sunstorm View Post
              Ooh, so pretty.

              DLGs are great, they get to a decent height without the hassle of a high-start.
              Yeah, managed a few tosses today before the rain and in between the rain. It's very exciting to try something new. Gotta get my throwing form for more consistent launches.

              Cheers,
              Adnan
              Take what you've got and fly with it - Jim Henson
              ... no plane will allow a pilot to recover from stupid. You still have to do those piloty things... - Joe Wurts
              Electric things run on smoke. Let the smoke out and they won't work.


              sigpic

              Comment


                #8
                Ok, while I waited for the epoxy to cure, I got started on the tail section. First up is to cut the slots for the CA hinges. To get the slots of consistent, I stacked painters tape to the desired height and placed my blade on top of them. I then clamped it down to the edge of the work bench. This is a very clever tip I got from the Binary 900 build thread on RCGroups.


                After that I CA'ed the rudder the vertical stab and sealed the hinge gap with Blenderm tape.
                Take what you've got and fly with it - Jim Henson
                ... no plane will allow a pilot to recover from stupid. You still have to do those piloty things... - Joe Wurts
                Electric things run on smoke. Let the smoke out and they won't work.


                sigpic

                Comment


                  #9
                  Now it's time to epoxy the wing saddles to the carbon boom.

                  To do this i dry fit the vertical stab to the carbon boom which I had earlier cut a slit for it. I also sanded the areas on the boom where the saddles were going to be epoxied. I then mounted the wing to the wing saddles and placed it upside down on the bench. I slid the boom through the wing saddles and set the vertical stabs perpendicular to the wing. Once I confirmed everything nice and straight I proceeded to epoxy the wing saddles to the boom.


                  (sanded areas on the boom where the wing saddles going to be)


                  (ensuring the vertical stab is perpendicular to the wing)
                  Take what you've got and fly with it - Jim Henson
                  ... no plane will allow a pilot to recover from stupid. You still have to do those piloty things... - Joe Wurts
                  Electric things run on smoke. Let the smoke out and they won't work.


                  sigpic

                  Comment


                    #10


                    The epoxy has cured and there's excess epoxy. I later grinded it off with my rotary tool.

                    Then it's on to glue the firewall into the fuse. I had to enlarge the inner hole a it as the wings were not sitting on the fuse nicely. A few rounds with the rotary tool's sanding attachment and I'm good to go. I then glued the firewall into the fuse with 20 minute epoxy.

                    The firewall was a very tight fit and i only noticed afterwards that it had actually cracked the fuse a teeny bit. My advise is to sand out the edges a bit so that it will it in better.

                    Take what you've got and fly with it - Jim Henson
                    ... no plane will allow a pilot to recover from stupid. You still have to do those piloty things... - Joe Wurts
                    Electric things run on smoke. Let the smoke out and they won't work.


                    sigpic

                    Comment


                      #11
                      Once the epoxy has cured on the firewall, I then proceeded to epoxy the boom to the firewall. And since i had enlarged the hole I used an epoxy/balloon mix to fill in the gaps at the same time. At the same time i CAed the end o the fuse to the boom. No pictures for these steps as I had no hands to do it and I was rushing to get it done before the epoxy hardens.

                      Next up, I sanded the horizontal stab mount to fit the contour of the boom. I did this by wrapping sandpaper around the boom and went a few rounds of sanding the block to shape.

                      After that's done i attached the horizontal stab to the mount temporarily with painter's tape as i measured to get it parallel with the wings. (There is an easier way to do this and you can read all about it at the RCGroups build thread )


                      Once I was satisfied that everything was straight I tacked the stab mount with CA and sprayed some kicker. I then removed the stab and glued it properly, keeping in mind to remove any excess CA.
                      Take what you've got and fly with it - Jim Henson
                      ... no plane will allow a pilot to recover from stupid. You still have to do those piloty things... - Joe Wurts
                      Electric things run on smoke. Let the smoke out and they won't work.


                      sigpic

                      Comment


                        #12
                        I then proceeded to CA the vert stab to the boom, ensuring it's all square.


                        Here's where i started deviating a bit. The instructions called for a coiled spring to be bent to provide the tension to the elevator. Pivlrs from RCG found that the spring did not hold up well and used a torsion spring instead. I heeded his advise and did the mod right from the beginning.


                        (left: is the torsion spring I employed for the elevator)


                        (the torsion spring attached to the elevator)


                        (the elevator at the "rest" position)

                        Once I finished putting the horizontal stab and elevator together, I proceeded to CA it onto the mount, as usual, ensuring all's square with the wings.

                        FG cloth was then used to reinforce the vert and horizontal stabs to the boom. I used CA to wet the FG cloth to save weight in the tail.

                        Take what you've got and fly with it - Jim Henson
                        ... no plane will allow a pilot to recover from stupid. You still have to do those piloty things... - Joe Wurts
                        Electric things run on smoke. Let the smoke out and they won't work.


                        sigpic

                        Comment


                          #13
                          At this stage the air frame is more or less all done. Only main thing to do is to attach the throwing peg. I outlined the wing on a foam board cutting it out to shape. Then I tried different peg locations ensuring they're all behind the plane's CG. Once I'm satisfied with the feel, I proceeded to use the foam board as a guide to mark out the peg location on the wing. Drilled a hole in the wing put the peg through, CAed it in place with the doublers and I'm done.


                          (the peg is not perpendicular to the wing to compensate for my longer middle finger)
                          Take what you've got and fly with it - Jim Henson
                          ... no plane will allow a pilot to recover from stupid. You still have to do those piloty things... - Joe Wurts
                          Electric things run on smoke. Let the smoke out and they won't work.


                          sigpic

                          Comment


                            #14
                            All that is left to do is the radio installation. Here's how I placed the stuff in the fuse.


                            (Marking out the parts i'm gonna cut out to make space for my rx)


                            (Pod layout. Checkout the nice small Fasst Rx up front )


                            (180mah NiMh batt under the rx)


                            (Close up of rudder pull-pull. I used a stapler to tighten the closed loop)


                            (Rudder pull-pull)


                            (Hole in boom for elevator pull string)

                            I used braided kevlar instead of the supplied metal wire in the kit to reduce weight.

                            AUW of the plane: 138g
                            Take what you've got and fly with it - Jim Henson
                            ... no plane will allow a pilot to recover from stupid. You still have to do those piloty things... - Joe Wurts
                            Electric things run on smoke. Let the smoke out and they won't work.


                            sigpic

                            Comment


                              #15
                              Beautiful!

                              This is beautiful work and a great build thread. What is the flying weight of this glider?

                              Comment

                              Working...
                              X