Announcement

Collapse
No announcement yet.

Scratch build Piper Pawnee

Collapse

Zenm Tech Pte Ltd

Collapse

Visit Zenmtech at rc.zenmtech.com

X
 
  • Filter
  • Time
  • Show
Clear All
new posts

    Scratch build Piper Pawnee

    There are many variations of the Pawnee, ranging from PA-36, Piper Brave, Piper Pawnee PA-25, etc. The differences comes from the size, round fins, square fins....those interested can read all about it from the internet.
    For simplicity, I will just refer my build here as the Piper Pawnee.

    I found this crop duster kind of an odd-ball model, the more you look at it, you may discover some beauty in this model. The almost constant wing chord also makes the build some what easier. So, I went around to search for free plan and finally found it in RC groups, and got the plans from Fred G.

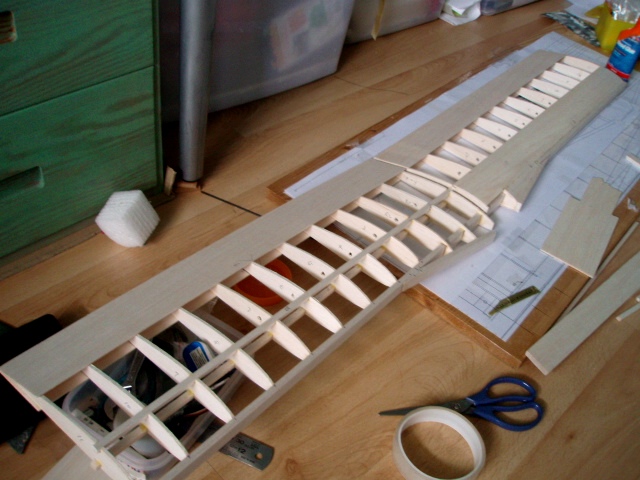
    I managed to print out the plan on A3 and tape up the pieces of puzzles. Decided to start on the Wings first as it is easier to build. This will be a very slow build as I am only working on the Pawnee build about once or twice a week.

    I have no target completion date.......yet.

    That's all for now.


    #2
    Heey KM;

    looking cool! Let's see you tow some gliders with it once it's done!

    Erm, can I have the plans please?
    "Always fly with a responsible attitude. You may think that flying low over other people’s heads is proof of your piloting skill; others know better. The real expert does not need to prove himself in such childish ways..." - the Multiplex Build Manual

    Comment


      #3
      Julian, PM me your email.

      Comment


        #4
        Wings

        Ok, started on the wings. The wing chord is constant except for the center 3 ribs, which are longer due to the enlarged LE fillet.
        I just made 1 template and cut out a master rib. Using the master, I traced the rest of the ribs onto 3/32 balsa and cut out all the ribs one by one. It took me some time to complete the cutting of all ribs. There were also the spar slots on the top and bottom of the ribs to be cut also. After almost about half a day, all the ribs were completed. There were total of 24 ribs for both wing panels.
        As most of the ribs were cut on the traced line itself, I had very little, if not, no sanding to be done on the ribs.
        Initially, I had wanted to use 1/8x1/4 spruce for the spars, but at that time, NTC had no stocks. After much consideration, I used 3/16x1/4 sq balsa spar. The spar strips were cut from 1/4 balsa stock.

        For those who are interested, please note that I use a regular NT cutter and snap off a section of the blade after about every 20-30 cuts. The key to having nice clean cut is VERY SHARP blades.
        NOTE: Be careful with sharp blades, it hurts your fingers when you are not. Don't ask me how I know.

        My arm was very sore after all the cutting
        No blood, just sweat....

        Comment


          #5
          Bro, sry asking such silly que, what machine do you trim that balsa? just wondering how smooth it was.. good luck for ya project!

          Comment


            #6
            The machine is called the MS special balsa cutter. You cannot buy it from any hobby shop...ha, ha.
            Seriously, all parts were hand cut. Just needs lots of patience and practice, sometimes luck.....as you have mentioned. That's why I enjoy building! It's wonderful to see the model take shape from pieces of wood through the process of building piece by piece.

            Thanks for your feedback. All comments, bad or badder are welcome. I am also learning from many others here.


            Originally posted by sham2951 View Post
            Bro, sry asking such silly que, what machine do you trim that balsa? just wondering how smooth it was.. good luck for ya project!

            Comment


              #7
              Originally posted by sham2951 View Post
              Bro, sry asking such silly que, what machine do you trim that balsa? just wondering how smooth it was.. good luck for ya project!
              Remember I mentioned 'slicing' instead of 'crushing' in your other thread?
              Seriously running out of ...Storage space !

              Comment


                #8
                Originally posted by Ghostfit View Post
                Remember I mentioned 'slicing' instead of 'crushing' in your other thread?
                Lesson learned. Cut with hotwire.

                Comment


                  #9
                  Originally posted by msc View Post
                  The machine is called the MS special balsa cutter. You cannot buy it from any hobby shop...ha, ha.
                  Seriously, all parts were hand cut. Just needs lots of patience and practice, sometimes luck.....as you have mentioned. That's why I enjoy building! It's wonderful to see the model take shape from pieces of wood through the process of building piece by piece.

                  Thanks for your feedback. All comments, bad or badder are welcome. I am also learning from many others here.
                  I tot those people cut those using somekind of hand saw machine.. that must be pain in d'ass.. anywae just bcareful,, cheers.

                  Comment


                    #10
                    It is cut with a penknife!

                    Personally I prefer a craft knife. I have a stock of 100 pieces of no.11 blades. Mmmm.

                    When it's done we must have Joe Yap's Blanik glider and this Pawnee meet up for a scale tow.
                    "Always fly with a responsible attitude. You may think that flying low over other people’s heads is proof of your piloting skill; others know better. The real expert does not need to prove himself in such childish ways..." - the Multiplex Build Manual

                    Comment


                      #11
                      Originally posted by Sunstorm View Post
                      It is cut with a penknife!

                      Personally I prefer a craft knife. I have a stock of 100 pieces of no.11 blades. Mmmm.

                      When it's done we must have Joe Yap's Blanik glider and this Pawnee meet up for a scale tow.
                      Wow, 100pcs of #11? Are these the real deal from X-Acto? I prefer the NT cutter snap-off type, I think it's cheaper

                      Anyway, I do not foorsee my Pawnee to be a capable tow plane. Especially with all the giant sailplanes around these days.

                      Comment


                        #12
                        Originally posted by msc View Post
                        Wow, 100pcs of #11? Are these the real deal from X-Acto? I prefer the NT cutter snap-off type, I think it's cheaper

                        Anyway, I do not foorsee my Pawnee to be a capable tow plane. Especially with all the giant sailplanes around these days.
                        That's why I suggested the Blanik and not his Pilatus ! Haha! The #11 has many brands, mine are brand MAXX from NTC hobbies.
                        "Always fly with a responsible attitude. You may think that flying low over other people’s heads is proof of your piloting skill; others know better. The real expert does not need to prove himself in such childish ways..." - the Multiplex Build Manual

                        Comment


                          #13
                          Wing Assembly

                          Prepared most of the parts for the wings, the LE is from 1/4 balsa, LE and TE sheeting is from 1/16 balsa. Drilled holes in the ribs for the servo wires.
                          First, the ribs were attached to the bottom spar followed by the top spar. To keep the ribs and spar structure rigid for further work, the LE needs to be glued in place. I used CA to hold the root and the end ribs, and PVA for the rest of the joints.
                          The root rib was angled to accommodate for the dihedral joint with the other panel. I cut a 5mm foam angle template to check the dihedral. For the rest of the ribs, a 90deg template was used.
                          With CA, the assembly work is very speedy and keeps the parts in place while waiting for the PVA to dry. No pins were used to hold down the wing.
                          The TE sheeting were glued onto the ribs. I had problem deciding if the Top sheeting is to overlap the bottom, or the Bottom to overlap the Top. Due to the overlap, the TE profile will be skewed and need to be sanded to keep to the original profile....more on this later.
                          There is a large LE fillet to be build into the wing, therefore, the 3 root ribs need to be larger. I modified the construction and kept the LE continuous to the end root rib. This will certainly provide a much stronger structure. If I go with the original plans, the joint where the LE meet the fillet will be very weak.
                          Next, the LE top and bottom sheeting is glued on with help of CA at the LE joint and lots of clothing pegs to keep the D-box in place while waiting for the PVA to dry.
                          After much hard work, the rough outline of 1 wing panel is almost complete!
                          I am very surprised that the wing structure is very stiff. I think it could be due to the 3/32 ribs and the thick section of the airfoil itself that contribute to the stiffness, despite the use of balsa spars. I intend to add in vertical sheer webs later to further add to the stiffness.

                          That's all for now. More work ahead!

                          MS

                          Comment


                            #14
                            more work on the wings

                            Lots to be done on the wings. The D-box towards the root of the wing is a bit tricky. There is the LE fillet as well as the thicker section of the middle 3 ribs. The sheeting onto the mating part of the LE fillet section needs to be trimmed during the sheeting process itself. Trim too much, there will be a big gap between the sheeting and the LE. Trim too little, the sheeting will not fit. It had to be a bit tight during the fitting.
                            I used PVA (wood glue) and cloth pegs, to give me the flexibility of adjusting the sheeting since the glue will take some time to cure.
                            Finally, I had got the 2 panels almost assembled.
                            After the glue is nice and dry, I trimmed the excess sheeting, following the contour of the profile of the airfoil using my credit card, from my 'well-liked' credit card company. The service sucks, but the credit card is useful.
                            I also used another foreign issued card, Axxxxx-Express, cut into strip and used as a spatula for apply the PVA glue. Very useful card, don't build planes without it! Do keep it at home, where it is more useful
                            The LE and TE is then rounded. This is one of the best part, transforming the square edges into curves. The TE is also sanded to follow the correct profile of the airfoil.
                            The wings are beginning to take shape!

                            More to come.

                            Comment


                              #15
                              Very nice work.
                              Here's my scratch built Pawnee.
                              Just a little smaller. From Walt Mooney plans. With Vapor gear.
                              -David-

                              Comment

                              Working...
                              X